
A Windows 11 laptop that dies at lunchtime and a Windows 11 laptop whose battery wears out in two years are two different problems, and they need two different fixes. Most guides mix them together into one long list of tips, which is why readers change ten settings, see no difference, and give up. This guide keeps the two goals apart. First, getting more hours out of each charge. Then, keeping the battery healthy so it still holds a charge years from now. Start with the goal that matches your problem, and skip the other half until you need it.
Two different battery problems
Read the two rows below and pick your goal. The settings in part one change how fast the battery drains today. The habits in part two change how much capacity the battery keeps over the years. Both matter, but they are not the same job, and doing only one of them leaves half the problem unsolved.
| Your goal | What you change | What you get |
|---|---|---|
| More hours per charge | Energy Saver, power mode, screen and sleep timers, brightness, and the app using the most battery | The laptop runs longer before it needs the charger |
| A battery that stays healthy | Charge limit, heat, and how you charge day to day | The battery keeps more of its original capacity for more years |
Part one: get more hours from each charge
Before changing anything, find out what is actually using the power. Guessing wastes time, and the culprit is usually one app, not the whole system.
1. Find the one app draining your battery
Windows keeps a per-app battery list, and it is the most useful page in this whole guide. Open Settings, go to System, then Power and battery, and open Battery usage. Switch the list to the last 24 hours and look at the top of the list, not the whole list. The app at the top is the one costing you the most charge.
If the top app is one you barely use, that is your answer. Select the three dots next to it, choose Manage background activity, and change Let this app run in the background. Power optimized is the sensible choice for most apps, and Never is the right choice for an app you only open on purpose. A browser with dozens of tabs, a video call app left running, or a game launcher syncing in the background are the usual names at the top of this list, and fixing one of them often beats changing five other settings. Do not set Never on messaging, email, or alarms, though: a silenced app saves battery by not doing its job.
2. Turn on Energy Saver, and set when it kicks in
Energy Saver is the current name for the feature older Windows 11 builds called Battery Saver. It dims the screen and limits background activity so the charge lasts longer. To set it up, open Settings, go to System, then Power and battery, and expand the Energy saver section. Next to Turn energy saver on when battery level is at, pick the level where it should start by itself. The default is 30 percent, and 40 percent suits a long day away from a charger better, because it gives the feature more time to work.
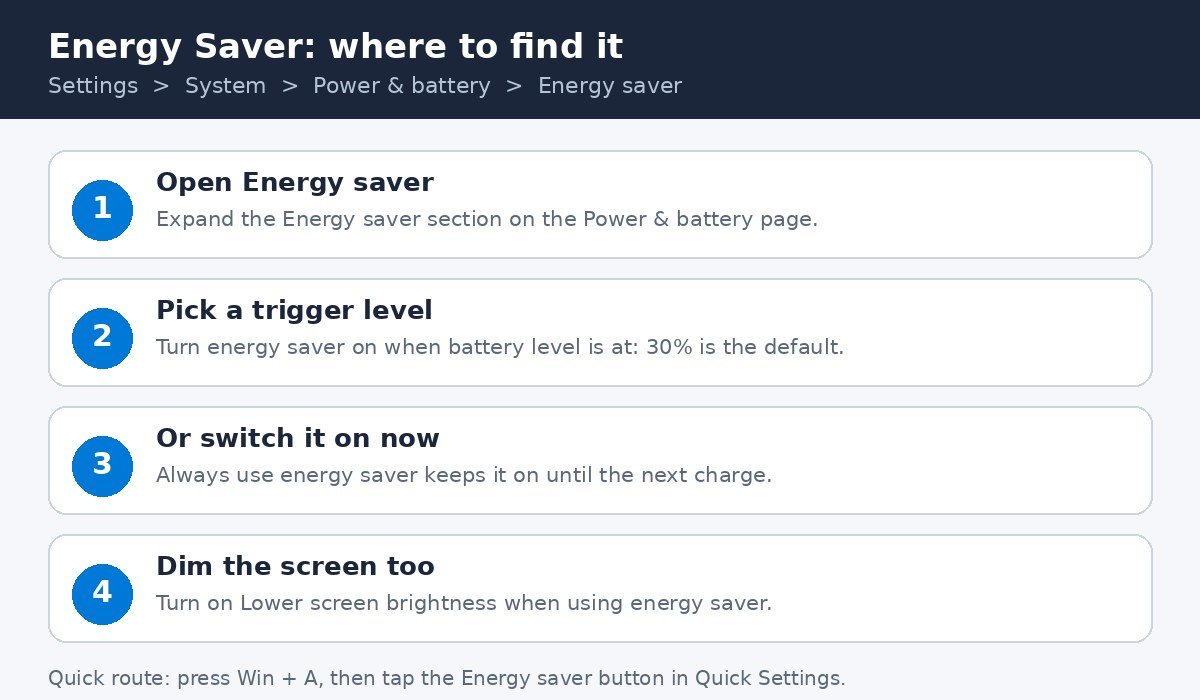
Two more switches in the same section are worth knowing. Always use energy saver turns the feature on right now and keeps it on until the next charge. Lower screen brightness when using energy saver dims the display while the feature runs, and the screen is the single biggest power draw on most laptops, so leave that one on. You can also switch Energy Saver on or off quickly by pressing Win and A to open Quick Settings, then tapping the Energy saver button. Microsoft keeps a short list of these settings in its battery saving tips for Windows, which is worth a look if you want the official wording.
3. Set the power mode to Best power efficiency
Power mode is the second big switch, and it is separate from Energy Saver. On the same Power and battery page, find Power mode and choose Best power efficiency. This tells Windows to favour battery life over speed, which mostly means the processor works less hard and background activity is held back. On current builds you can pick a different mode for plugged in and on battery, so you can keep Best performance at your desk and Best power efficiency on the move. One limit to know: this option is not available on every PC, since it depends on the hardware and the laptop maker.
4. Shorten the screen and sleep timers
A laptop left awake on a desk is a laptop draining its battery for nothing. On the Power and battery page, open Screen, sleep and hibernate timeouts. Set Turn my screen off after to 3 minutes on battery, and Make my device sleep after to a short value such as 3 to 10 minutes on battery. Microsoft has already tightened the defaults on new Windows 11 PCs, with the screen turning off after 3 minutes and sleep after 3 minutes on battery for modern standby laptops.
Sleep still uses a small amount of power, while hibernation saves your open work to disk and switches the laptop fully off, using no battery at all. That makes hibernation the better choice when you close the lid for hours rather than minutes, for example overnight or during a flight. If hibernation is missing from your power menu, our guide to how to turn off hibernation on Windows 11 also explains how to check whether it is enabled on your machine.
5. Turn down the screen
The display uses more power than anything else on most laptops, so brightness is the fastest single saving you can make. Open Settings, go to System, then Display, and move the Brightness slider down to a level that is still comfortable to read. A small drop is enough: you do not need a dim screen, just one that is not at full brightness indoors. Our step-by-step guide to how to adjust brightness on Windows 11 covers the slider, the keyboard shortcut, and the automatic brightness options in detail.
Two more display settings help on some laptops. In Display, then Advanced display, a lower refresh rate uses less power, and if your laptop offers Dynamic refresh rate, turning it on lets Windows drop the rate when nothing on screen is moving.
6. Small settings that add up
None of these is dramatic on its own, but together they close the gaps the big settings leave behind. Start with Energy recommendations on the Power and battery page: it lists the inefficient settings on your machine and offers an Apply all button that fixes them in one click. Then open Settings, go to Apps, then Video playback, and set Battery options to Optimize for battery life. Finally, switch on Airplane mode when you do not need the internet, and turn off Wi-Fi and Bluetooth from Quick Settings when you are not using them.
Part two: keep the battery healthy for years
A laptop battery is a consumable part. Every full charge and discharge wears it a little, and heat and time wear it faster. You cannot stop that wear, but you can slow it down a lot, and the difference between a battery treated well and one left at 100 percent on a hot desk for two years is easy to see in the report at the end of this section.
1. Cap the charge at 80 percent
The single most effective habit is not charging to 100 percent all the time. Microsoft advises keeping the battery roughly between 20 and 80 percent whenever possible, because holding a lithium-ion battery at full charge stresses it and speeds up capacity loss. Windows itself has no charge limit setting, so the limit lives in your laptop maker’s own app or in the firmware settings that load before Windows. That is the step most guides skip, and it is the reason this one names each maker separately.
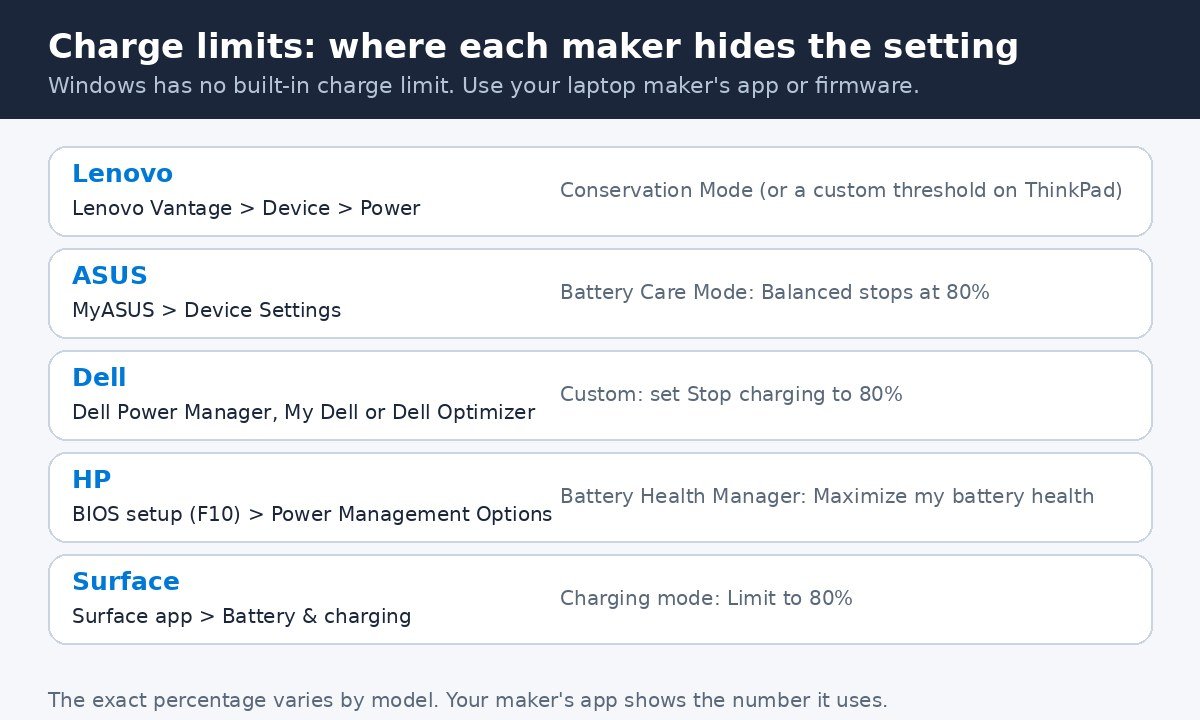
Lenovo. Open Lenovo Vantage, go to Device, then Power, and turn on Conservation Mode. On many current models this holds the battery around 75 to 80 percent, and on some models the cap sits lower, near 55 to 60 percent, so check the number your copy of Vantage shows. On a ThinkPad you can set your own threshold instead: open Battery settings and set Stop charging at to 80 percent.
ASUS. Open MyASUS, go to Device Settings, and turn on Battery Care Mode. Balanced mode stops charging at 80 percent and starts again below 78 percent, which is the right choice for most people. Maximum Lifespan mode stops at 60 percent and suits a laptop that almost never leaves its charger.
Dell. Open Dell Power Manager, or My Dell or Dell Optimizer on newer models, go to Battery Information, then Settings. Choose Custom and set Stop charging to 80 percent, or pick Primarily AC Use, which lowers the charge limit automatically for a laptop that lives plugged in.
HP. Many HP laptops put this setting in the firmware, not in Windows. Restart the laptop, press F10 repeatedly to open the BIOS setup, go to Advanced, then Power Management Options, and open Battery Health Manager. Choose Maximize my battery health, which caps the charge at 80 percent. One quirk to expect: the battery icon in Windows may still show 100 percent while the cap is on, because Windows reports the capped level as full.
Surface. Open the Surface app, go to Battery and charging, and under Charging mode choose Limit to 80 percent. Surface devices also run Smart charging in the background, which caps the battery at 80 percent by itself when the device has been plugged in for a long time or used at high temperatures. There is also a stricter UEFI setting called Battery Limit, which stops charging at 50 percent, but that is meant for devices that stay plugged in permanently, such as a kiosk, and it is the wrong choice for a laptop you carry around.
If your maker is not listed here, search the Start menu for your maker’s app, such as Acer Care Center or MSI Center, and look for a battery or power section: most makers now ship a version of this feature under a different name. When you do need a full charge, for a flight or a long day out, turn the limit off the night before, charge to 100 percent, and switch it back on when you return.
| Your situation | What to do with the charge limit |
|---|---|
| The laptop lives on a desk, plugged in most days | Turn the limit on and leave it on |
| You carry the laptop out most days | Turn the limit on, but charge to 100 percent the night before a long day away from power |
| You are travelling tomorrow | Turn the limit off tonight so the battery charges fully |
| The laptop will sit unused for weeks | Charge it to about half, then store it somewhere cool and dry |
2. Keep the battery cool, and avoid deep drains
Heat is the other great battery killer. Microsoft warns that using or charging a device at high temperatures can permanently reduce its capacity, so keep the laptop out of direct sun, never leave it in a hot car, and do not block its vents by using it on a bed or a cushion.
Charging habits matter too. Avoid running the battery down to empty again and again. The pattern that treats the battery best is the ordinary one: use it through the day, charge it when it gets low, and unplug it once it is charged. Microsoft explains the reasoning, including what to do with a battery that swells, in its guide to caring for your battery in Windows.
If you plan to store a laptop for a long time, charge it to around 40 to 60 percent first, and check the level now and then so it does not drain to empty while it sits. A battery stored fully charged loses capacity faster, and one stored empty can drop so low it will not charge again.
3. Check the battery’s health with a battery report
Settings shows the charge level, but it does not show how healthy the battery is. Windows has a built-in report for that, and it takes one command to make. Select Start, type Command prompt, right-click Command Prompt, and choose Run as administrator, then select Yes. Type powercfg /batteryreport and press Enter. Windows prints the location of the file it just made, which is named battery-report.html. Open File Explorer, go to that folder, and double-click the file to open it in your browser.
The report is long, and you only need one section: Installed batteries, near the top. It shows two numbers that matter. Design Capacity is how much charge the battery was built to hold when it was new. Full Charge Capacity is how much it holds now when charged to 100 percent. Divide the second number by the first and multiply by 100, and you have the share of the original capacity that is left.
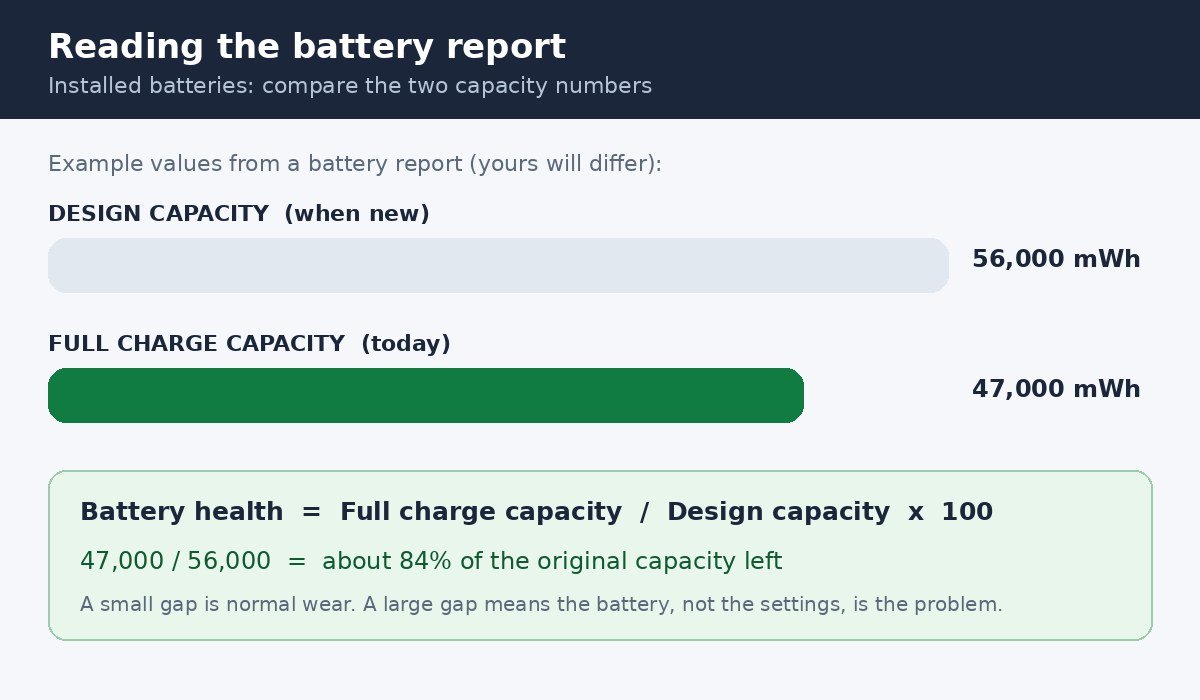
A small gap is normal wear, and every battery shows one after a year or two. A large gap means the battery has lost a lot of its capacity, and no setting in part one will bring those hours back. Battery capacity history, further down the report, shows whether the capacity slid down slowly, which is normal, or dropped suddenly, which is worth asking the maker about. Run the report again in a few months and compare the numbers: a slow, steady change is normal ageing, and a fast change is a reason to contact the maker while the warranty still covers it.
When the battery is the problem, not the settings
Some symptoms mean the battery itself needs attention, and no amount of settings work will fix them: the laptop shuts down suddenly while the battery icon still shows charge left, the battery percentage jumps around, or the laptop only works while plugged in. A swollen battery is the most serious sign: if the laptop case is bulging, the trackpad feels raised, or the battery looks puffed up, stop using the device, do not press or puncture the battery, and contact the maker or a repair shop. For anything else on this list, the next step is the maker’s support page for your exact model, with the battery report numbers in hand, because those numbers are what support will ask for first.
Your battery plan in five minutes
- Open Battery usage and find the one app using the most power, then limit its background activity.
- Turn on Energy Saver and set it to start at 30 or 40 percent.
- Set the power mode to Best power efficiency for use on battery.
- Set the screen to turn off after 3 minutes on battery, and turn the brightness down a notch.
- Turn on your maker’s charge limit, so the battery stops at 80 percent when the laptop lives on a charger.
- Run powercfg /batteryreport once, note the two capacity numbers, and check them again in a few months.
Most of the work here is a one-time setup, not a daily chore. Set Energy Saver, the power mode, and the charge limit once, fix the one app that was draining the battery, and the laptop will simply last longer on a charge and keep more of its capacity for longer. Check the battery report every few months, and if the numbers start sliding fast, talk to the maker while there is still time to do something about it.

- How to Extend Battery Life on a Windows 11 Laptop - November 21, 2026
- How to Turn Off App Tracking on iPhone - November 20, 2026
- How to Turn Off AirPlay Receiver on Mac - November 19, 2026