
Paint is the free image editor that comes with Windows 11, and the current version does far more than the simple drawing tool many people remember. You can resize and crop photos, add captions, cut out a subject, stack edits on layers, and save the result in the right format, all without installing anything else. This guide walks through each job in order, using the tools as they appear in the current Paint app, which updates through the Microsoft Store. A few of the newer AI tools need a Copilot+ PC, and this guide says plainly which ones, so you do not waste time hunting for a button your PC does not have.
Open Paint and get a picture on the canvas
The fastest way to open Paint is to click Start, type Paint, and press Enter. You can also right-click any image file in File Explorer and choose Open with, then Paint. If you want a blank canvas instead, open Paint and choose File, then New.
Paint opens the picture on a canvas you can zoom with the slider in the bottom right corner. Zooming only changes how the picture looks on screen, not the file itself, so zoom in close when you need to check an edge or a detail, then zoom back out to see the whole picture.
A screenshot from the clipboard goes straight onto the canvas with Ctrl+V. Paint drops a pasted picture onto its own layer, so you can drag it into place before you do anything else. If you need the screenshot itself first, our guide to taking a screenshot on Windows 11 walks through every method, from Print Screen to the Snipping Tool.
If a button in this guide is missing from your copy of Paint, the app itself is probably out of date. Open the Microsoft Store, go to Library, and select Get updates. Paint updates through the Store, not through Windows Update, so a new tool can arrive without a Windows restart. Microsoft’s Paint page describes the current set of tools.
Resize a photo without ruining it
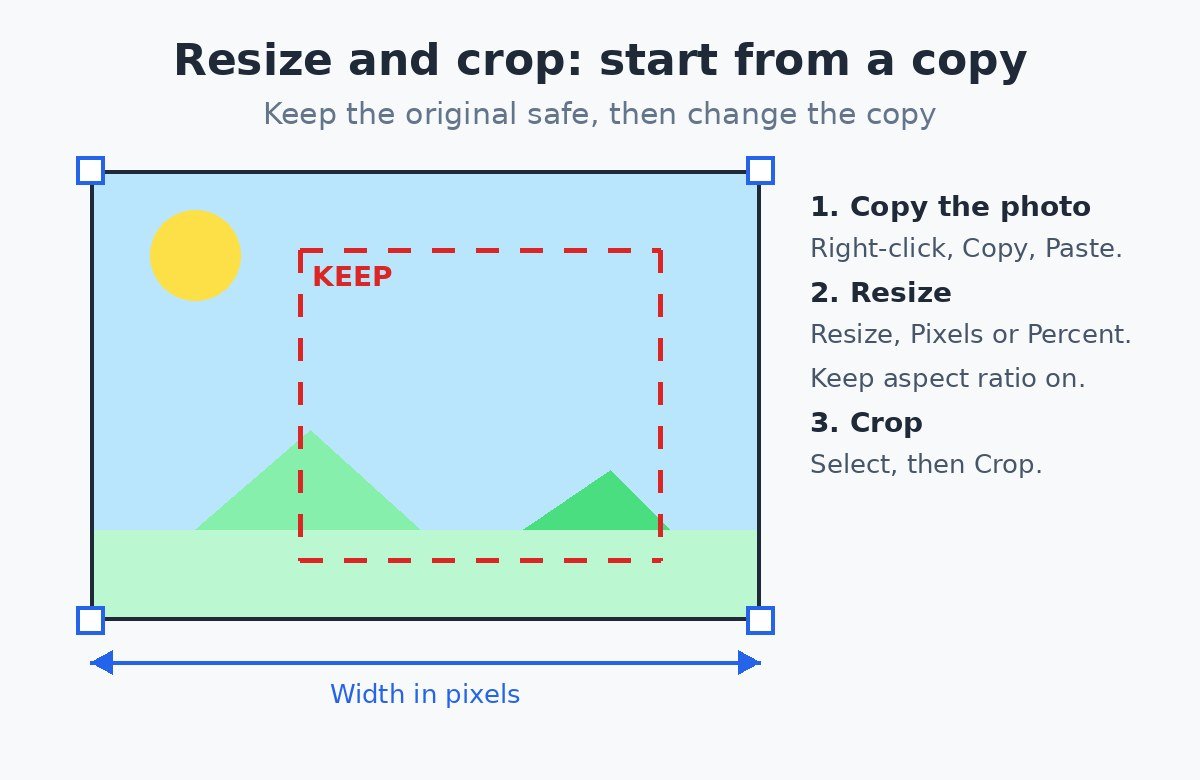
Start by making a copy of the photo. Resizing changes the file for good once you save, and an original shrunk to a small size cannot be blown back up to full quality. In File Explorer, right-click the photo, choose Copy, then right-click an empty space in the same folder and choose Paste.
- Open the copy in Paint and click Resize in the toolbar.
- Choose Percentage when you want the picture half or a quarter of its current size, or Pixels when a website or form asks for an exact size, such as 1200 pixels wide.
- Type the new size, leave Maintain aspect ratio turned on, and click OK.
- Check the result on screen before you save anything.
Maintain aspect ratio locks the width and height together, so changing one changes the other and the picture keeps its shape. Turn it off only when you know the picture should be stretched, which is rare.
Shrinking a photo is safe, because Paint throws away detail you do not need. Enlarging is the opposite: a small picture stretched to twice its size turns soft and blurry, and no setting in Paint can put the missing detail back. If a picture is already small, keep it small or find the original at a bigger size.
Crop a photo to the part that matters
Cropping cuts away the edges and keeps only the part you want. Click the Selection tool in the toolbar, then drag a rectangle around the part to keep. Click Crop, and everything outside the rectangle disappears.
Crop before you do fiddly work such as background removal. A tighter picture gives the background tool less to guess at, and the result is cleaner around the edges.
If the crop cuts off too much, press Ctrl+Z to undo it and try again with a wider rectangle. Undo works step by step in Paint, so you can walk back through several changes without starting over.
Add text to a picture
Click the Text tool, marked with the letter A, then click on the picture where the words should go. Type the text, and while the text box is still active you can change the font, size and colour from the toolbar.
Pick a colour that stands out against what sits behind the words. Dark text on a dark photo is hard to read, so either choose a light colour or drag the text box over a plainer part of the picture. A short caption in a large size reads better than a long sentence squeezed into a small space.
Click outside the box when you are done, and check the spelling first. Once you click away, the words can no longer be edited as text, so a typo means deleting the text and typing it again.
Remove the background from a photo
Open the photo and click Remove background in the toolbar. Paint works out which part is the subject and deletes the rest, leaving a checkerboard pattern where the background used to be. That checkerboard is how Paint shows transparency, and it is not part of the picture.
The tool works best when the subject stands out clearly from what is behind it: a person against a plain wall, a product on a table, a pet on grass. Busy backgrounds with colours close to the subject give it more trouble, and you may see rough edges or missing bits around hair, fur or thin objects.
Check the edges before you save. Zoom in with the slider at the bottom right and look around the outline of the subject. If Paint took too much, press Ctrl+Z and try again after cropping the picture tighter. If a few stray marks remain, the Eraser tool cleans them up.
Save the result as a PNG picture if you want the transparency to survive. That is the step most people miss, and the next sections explain why the format matters.
Draw, fill and erase
The Pencil draws thin freehand lines and the Brush paints wider strokes in several styles. Pick a tool, choose a size from the toolbar, then pick a colour. The colour picker, marked with an eyedropper, copies any colour already in the picture, which is handy when you want a new line to match something that is already there.
Fill with color pours paint into a closed shape, like a bucket tipped into a cup. It only works when the outline has no gaps, because even a one pixel break lets the colour leak out across the picture. If the colour floods the whole canvas, undo it, zoom in, and look for the gap in the outline.
Shapes sit in the toolbar too. Draw a rectangle, circle or arrow, then set its outline colour, fill colour and line thickness before you draw. The Eraser removes what you do not want. On a plain background it paints with the second colour, which is white by default, while on a layer with transparency it erases to see-through.
Generative Erase is the smarter cousin of the ordinary eraser. Select the Eraser, choose Generative erase, brush over something you want gone, such as a stray person or a bin in the background, and click Apply. Paint fills the gap with a reconstruction of what sits around it. It works on any Windows 11 PC with the current Paint app, not only on Copilot+ PCs, and it works best on small objects against simple backgrounds.
Use layers to keep your edits separate
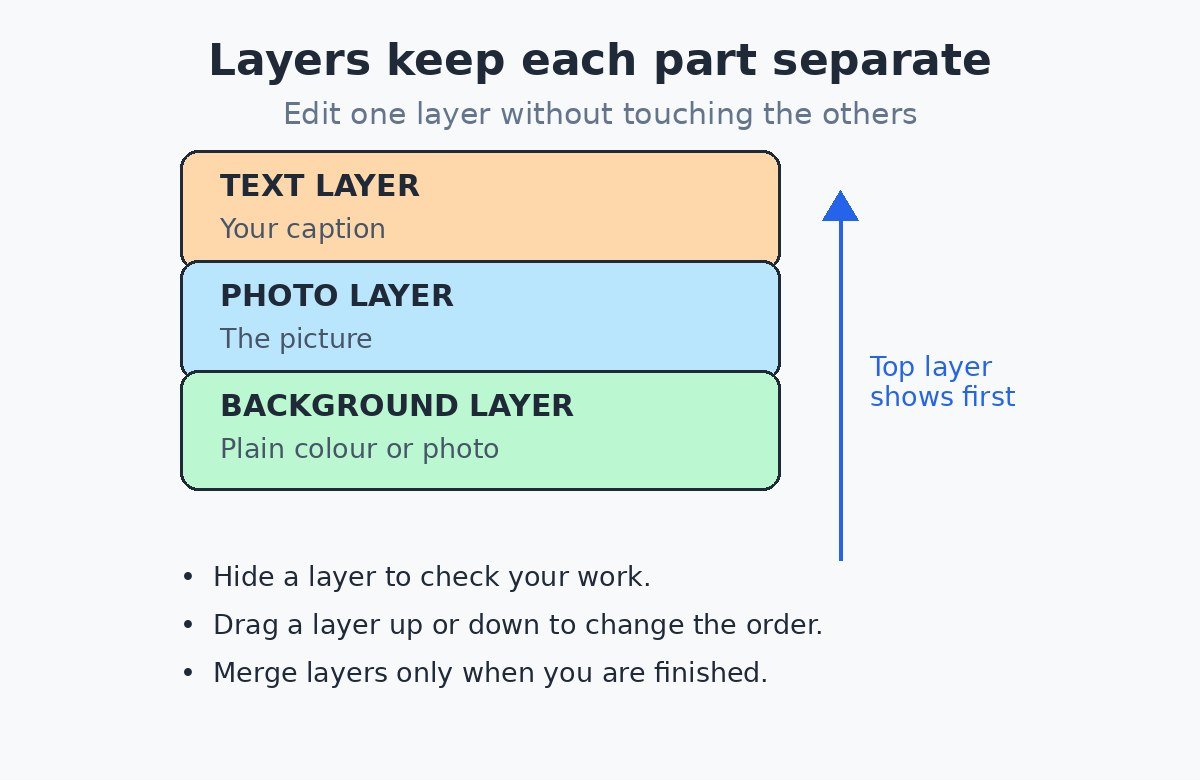
Layers are the biggest change in the current Paint, and they make it far more forgiving. Click the Layers button in the toolbar to open the panel on the right. Each layer is a separate sheet: the photo on one, the text on another, a shape on a third. You can edit one sheet without touching the others.
Click the plus button in the Layers panel to add a layer, then draw or paste on it. Drag a layer up or down to change which one shows on top. Click the eye icon beside a layer to hide it, which is useful when you want to check how the picture looks without the caption, or without a shape you are unsure about.
A pasted picture and a text box each land on their own layer, which is why moving them later is easy. Merge layers only when you are finished, because merging flattens them into one sheet and the separate editing is gone.
Newer versions of Paint also offer File, then Save as project, which stores the work as a .paint file with the layers intact, so you can close the app and pick up later. It arrived with a late 2025 Paint update, so if your copy of Paint does not show it, update the app through the Microsoft Store first. A .paint file only opens in Paint, so export a PNG or JPG copy when you want to share the picture.
Save in the right format
Press Ctrl+S to save over the file you opened, or choose File, then Save as, to pick a new name or a different format. Save as is the safer habit, because it leaves the original file untouched.
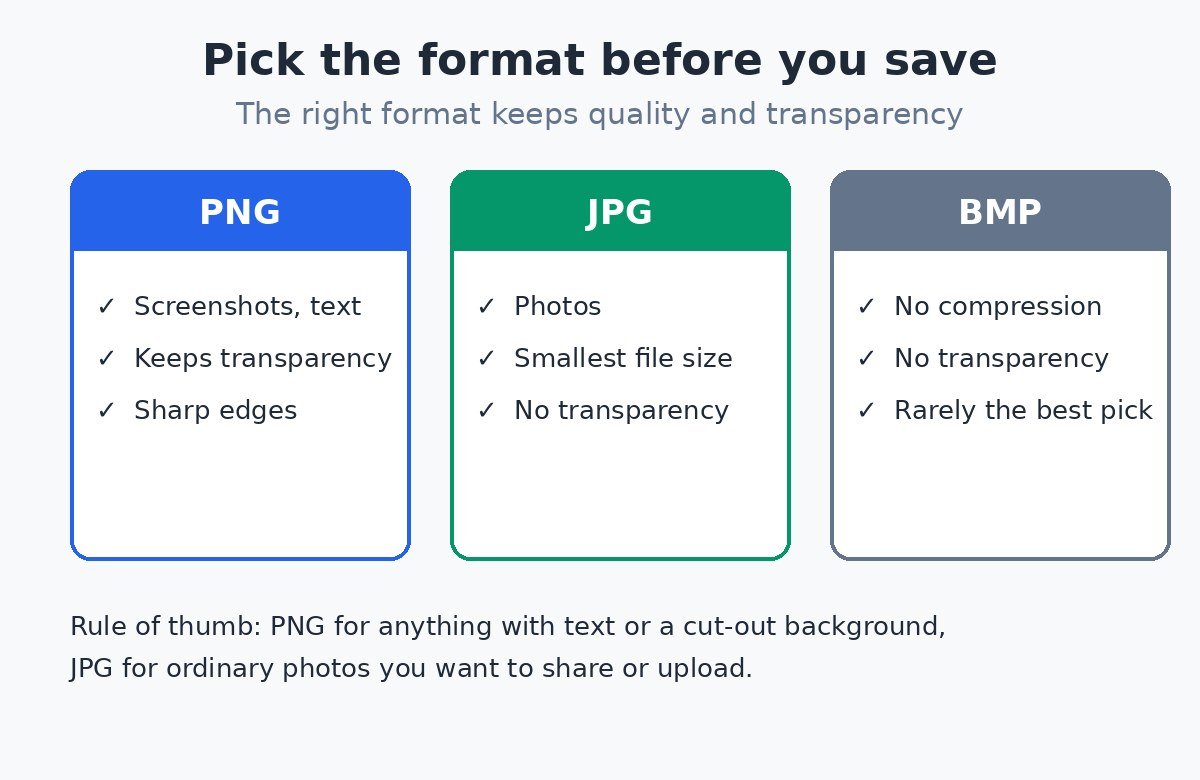
The format you pick decides two things: how big the file is, and whether see-through areas survive. PNG keeps every pixel exactly and keeps transparency, which makes it the right choice for screenshots, pictures with text, and anything with a removed background. JPG squeezes photos into much smaller files, which is why it is the usual choice for sharing and uploading, but it cannot store transparency, and saving a photo as JPG again and again slowly wears away fine detail.
| Format | Best for | Transparency | File size |
|---|---|---|---|
| PNG | Screenshots, text, cut-outs | Yes | Larger |
| JPG | Photos to share or upload | No | Small |
| BMP | Rarely needed | No | Very large |
| GIF | Simple graphics, few colours | One colour only | Small |
BMP saves every pixel with no compression at all, which makes the file very large for no visible gain, so it is rarely the right pick. GIF suits simple graphics with few colours, and it is the only other format here that stores any transparency, but only as a single see-through colour, which leaves hard edges.
The common mistake is removing a background and then saving as JPG. JPG has nowhere to store transparency, so Paint fills the see-through area with a solid colour, usually white, and the cut-out is ruined. If the background came out white when you expected see-through, save again as PNG and the checkerboard comes back.
Which Paint features need a Copilot+ PC
Paint now has two kinds of features, and the line between them is the part that confuses people. The everyday tools in this guide work on any Windows 11 PC with the current Paint app. The AI tools that generate pictures or rewrite parts of one need a Copilot+ PC, which is a newer class of Windows 11 PC with a neural processing unit that can perform more than 40 trillion operations per second. A Copilot+ PC is sold under that name, so check the listing, the box or the sticker on the machine. If the PC was not sold as a Copilot+ PC, it is not one.
| Feature | What it needs |
|---|---|
| Layers, transparency, background removal | Any Windows 11 PC, current Paint app |
| Generative Erase | Any Windows 11 PC, current Paint app |
| Image Creator | Microsoft account, AI credits, internet |
| Cocreator | Copilot+ PC, Microsoft account, internet |
| Generative Fill | Snapdragon-powered Copilot+ PC |
| Object Select | Copilot+ PC |
| Sticker Generator | Copilot+ PC, Microsoft account |
Cocreator turns a rough sketch and a text prompt into finished artwork as you draw, and Generative Fill adds an object you describe into a selected area. Both live on the Copilot+ side of the line. Generative Fill is narrower still: Microsoft says it needs a Snapdragon-powered Copilot+ PC, so even some Copilot+ PCs do not have it.
Image Creator sits in the middle. It generates pictures from a text prompt using a cloud service, so it needs a Microsoft account sign-in and spends one AI credit per set of images. Microsoft 365 Personal and Family subscribers get 60 AI credits a month. It does not need a Copilot+ PC.
If a button in this guide is missing, check two things before anything else: update Paint through the Microsoft Store, and check whether the feature is one of the Copilot+ exclusives above. Microsoft’s guide to Copilot+ PC features in Paint lists each one with its requirements.
Where did Paint 3D go
If you learned image editing in Paint 3D, the first surprise is that the app is gone from the Microsoft Store. Microsoft deprecated Paint 3D in August 2024 and removed it from the Store on November 4, 2024. It was never preinstalled on Windows 11, so most Windows 11 PCs never had it in the first place.
A copy that is already installed keeps working, according to Microsoft, but it gets no updates, and once it is uninstalled there is no supported way to get it back. Do not download Paint 3D from a third-party site: Microsoft is the only publisher of the app, and it has withdrawn the download.
The jobs Paint 3D used to do have split across other apps. For 2D pictures, Microsoft points to Paint or Photos. For looking at 3D models, the replacement is Babylon.js Sandbox, which opens in a browser. The current Paint covers the 2D side with layers, background removal and text, but it has no 3D modelling tools, and no update is going to add them.
Paint is missing or will not open
First, check that Paint is really gone. Click Start and type Paint. If nothing appears, open the Microsoft Store, search for Paint, and install it from the Paint listing. It is free and included with Windows 11.
If Paint is installed but will not open or crashes, repair it before you reinstall it. Go to Start, then Settings, then Apps, then Installed apps. Find Paint, click the three dots beside it, and choose Advanced options. Select Repair, then try opening Paint again. If Repair does not fix it, go back to the same page and select Reset, which puts the app back to a fresh state.
If Paint still misbehaves after a reset, uninstall it from the same Installed apps list and install it again from the Microsoft Store. A restart in between clears any stuck process. If several Store apps are broken at once, the problem is usually Windows itself rather than Paint, so run Windows Update and install any pending updates before you dig further.
Paint will never replace a professional editor, and it is not trying to. Its strength is speed: the jobs in this guide take a minute or two each, and they cover most of what an everyday picture needs. Open a copy of a photo, resize or crop it, add a line of text if it needs one, save it as PNG when transparency matters and JPG when it does not, and leave the Copilot+ tools for the day you own a PC that has them.

- How to Use Paint in Windows 11 - November 21, 2026
- How to Turn Off Spotlight Suggestions on Mac - November 20, 2026
- How to Speed Up Windows 11 - November 19, 2026