
If your Windows 11 PC takes forever to start or stutters when you open apps, you do not need a new computer yet, and you do not need a paid optimizer app either. Most slow PCs are slow for a handful of fixable reasons: too many apps launching at startup, a nearly full drive, missing updates, or settings that trade speed for looks. This guide walks through 12 safe, built-in fixes in the order that helps most people first, written for Windows 11, including version 26H2, which became generally available on 29 September 2026. Every change here is reversible.
The fastest fixes, if you only have five minutes: restart from Start, then Power, then Restart; open Task Manager with Ctrl, Shift and Esc, go to Startup apps, and switch off the apps you do not need at sign-in; go to Settings, then System, then Storage, and run Storage Sense; and go to Settings, then Windows Update, select Check for updates, and install everything offered, including optional driver updates. Those four fix the most common causes of a slow PC, they cost nothing, and you can undo any of them in a minute. If they do not help, read the next section first to find which part of the PC is struggling, then jump to the fix that matches.
1. First, find out what is actually slow
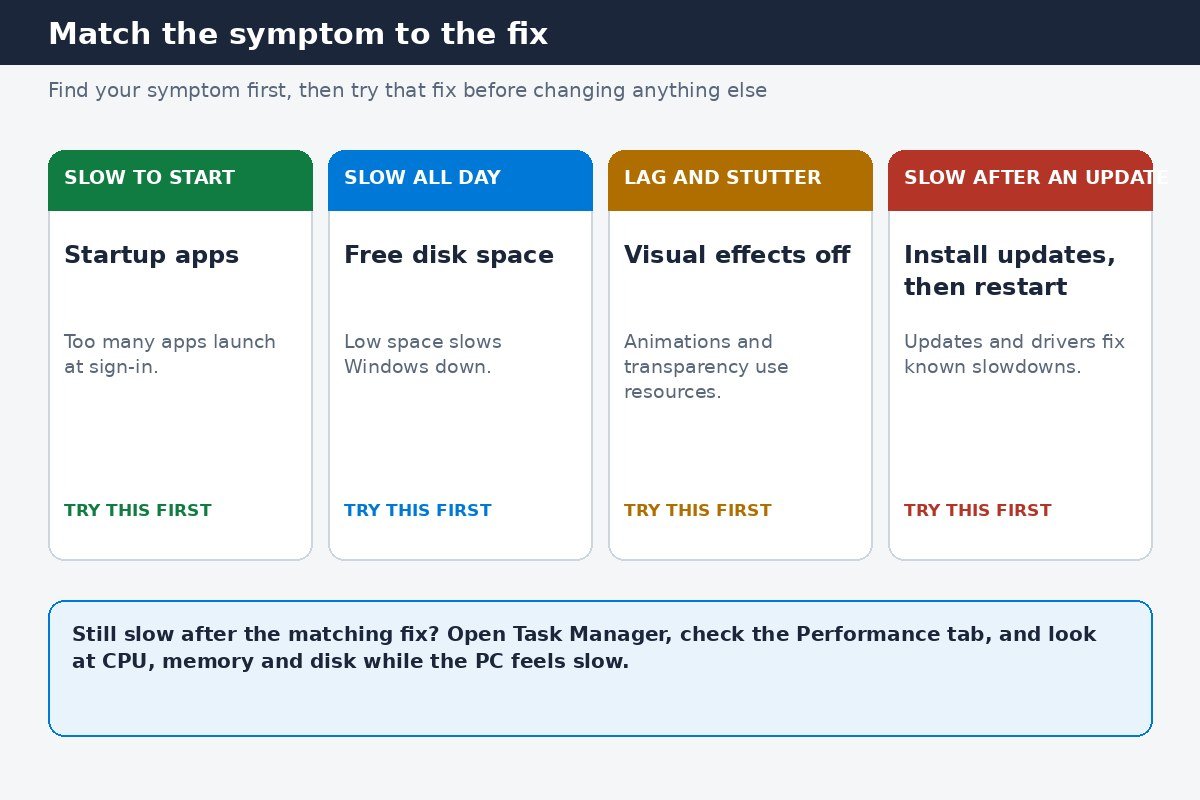
Slow can mean several different things, and each one has a different fix. A PC that takes ages to reach the desktop usually has too many startup apps. A PC that crawls once the browser fills with tabs is usually short on memory. A PC where everything feels sluggish is often short on disk space or still running on an old hard drive. This two-minute check saves you from changing settings that were never the problem.
Press Ctrl, Shift and Esc to open Task Manager. On the Processes tab, click the CPU, Memory or Disk column heading to sort by that column, so the heaviest apps rise to the top. If one app sits at the top while the PC feels slow, that app is the problem, not Windows, so close it and see if the PC recovers. Then open the Performance tab and watch the CPU, Memory and Disk graphs for a minute while the PC feels slow. A graph that stays near 100 percent points at the bottleneck: CPU means the processor is busy, memory means the PC has run out of RAM, and disk means the drive cannot keep up. Check your version first as well, because menu names move between versions: go to Settings, then System, then About. The steps here are written for Windows 11, including versions 24H2, 25H2 and 26H2.
| What you notice | What to check first | Fix to try first |
|---|---|---|
| Slow to reach the desktop after sign-in | Task Manager, Startup apps tab, Startup impact column | Switch off high-impact startup apps you do not need |
| Fine at first, slow once apps and tabs pile up | Task Manager, Performance tab, Memory graph | Close unused apps and tabs, then check background apps |
| Everything feels sluggish, folders open slowly | Settings, System, Storage, free space on the C drive | Run Storage Sense and uninstall apps you do not use |
| Slow only since an update | Windows Update, pending installs and restarts | Finish updates, restart, then give indexing a few hours |
| Windows stutter and windows open with a delay | Settings, Accessibility, Visual effects | Switch off Transparency effects and Animation effects |
| Slow on battery, fine when plugged in | Settings, System, Power and battery, Power mode | Set Power mode to Best performance while plugged in |
One warning about timing: a PC can be slow for a few hours right after a feature update, while Windows finishes indexing files. If the slowness started on the day of an update, leave the PC on and judge the speed the next day.
2. Stop apps from launching at startup
Startup apps are the single biggest cause of a slow sign-in, and the fix takes about two minutes. Apps that run at startup can slow boot time and increase background usage, in Microsoft’s own words, and many apps add themselves to the list without asking clearly. Chat apps, cloud storage, music players and printer software are the usual names, and most of them do not need to run the moment you sign in.
Press Ctrl, Shift and Esc to open Task Manager, then select Startup apps from the left-hand menu. The list shows each app, whether it is enabled, and its Startup impact rating of Low, Medium or High. High impact apps slow sign-in the most. Right-click an app you do not need right away and select Disable. There is a second place to check as well: go to Settings, then Apps, then Startup, which shows the same list as simple on and off switches.
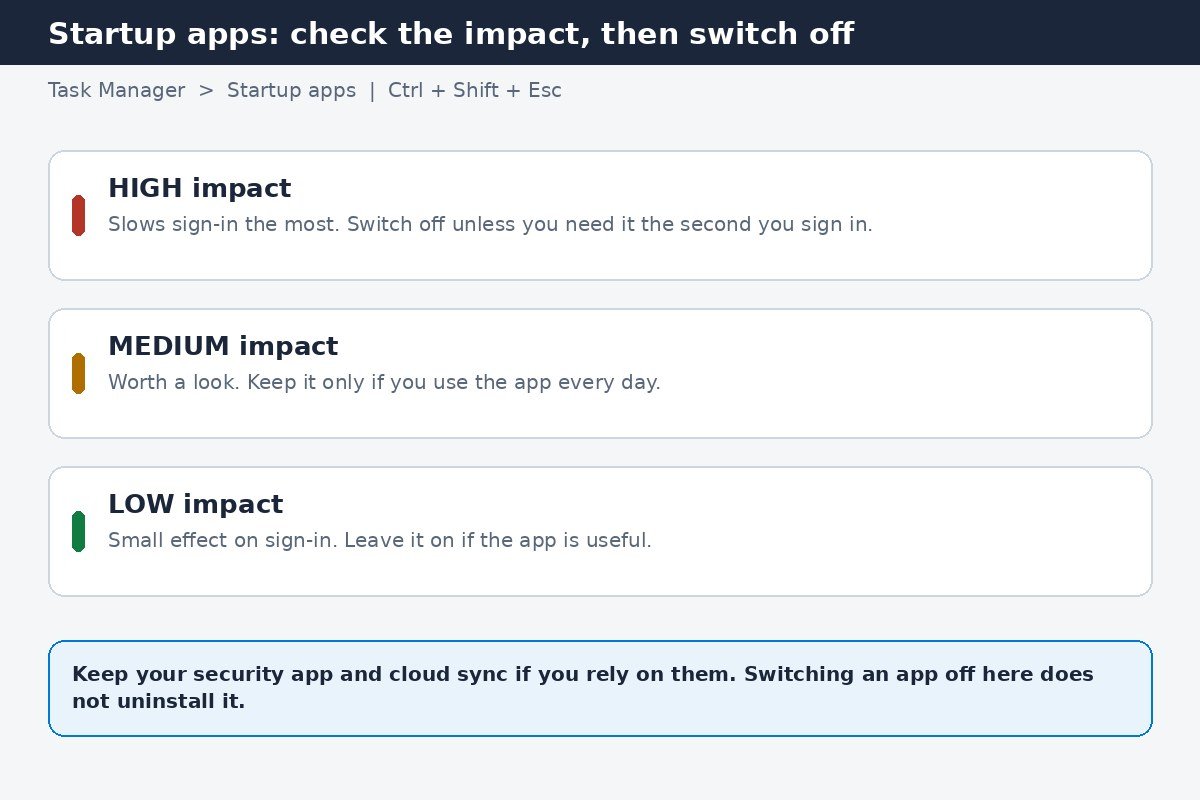
Be careful with two kinds of app. Leave your security app alone, because it protects the PC from the moment you sign in. Think before you switch off cloud storage or a messaging app you rely on, because it will stop syncing until you open it. Switching an app off at startup does not uninstall it, so if you miss it, set it back to Enabled. Microsoft Teams is one of the most common apps people find launching on its own, and it has its own startup setting as well, so if Teams keeps appearing after you switch it off here, follow our guide to stop Microsoft Teams from opening on startup in Windows 11 for the full fix. Next, tame the apps that keep running in the background even when you are not using them. Go to Settings, then Apps, then Installed apps, find the app, select More options (the three dots), then Advanced options. Under Background app permissions, in the Let this app run in the background list, select Never. Do this only for apps you do not need updating in the background, such as games or tools you open once a month, and leave messaging, email and cloud apps alone if you want their sync to keep working.
3. Free up disk space with Storage Sense
Low disk space can reduce system performance, and Windows needs breathing room on the system drive to work properly. When the C drive is nearly full, updates struggle to install and everything feels slower. Before you delete anything by hand, use the built-in cleanup tools, because they know which files are safe to remove and which are not.
Go to Start, then Settings, then System, then Storage. Select Storage Sense, then select Run Storage Sense now for an immediate cleanup. Storage Sense clears temporary files and items in the Recycle Bin, and you can set it to run on a schedule so the drive does not fill up again. Two details matter. Storage Sense works on the system drive only, which is usually the C drive, so it will not clean a second drive. And it does not touch your Downloads folder or your cloud files unless you set it up to do so, so leave the Downloads setting alone unless you treat that folder as temporary. The full options are covered in Microsoft’s own guide to managing drive space with Storage Sense.
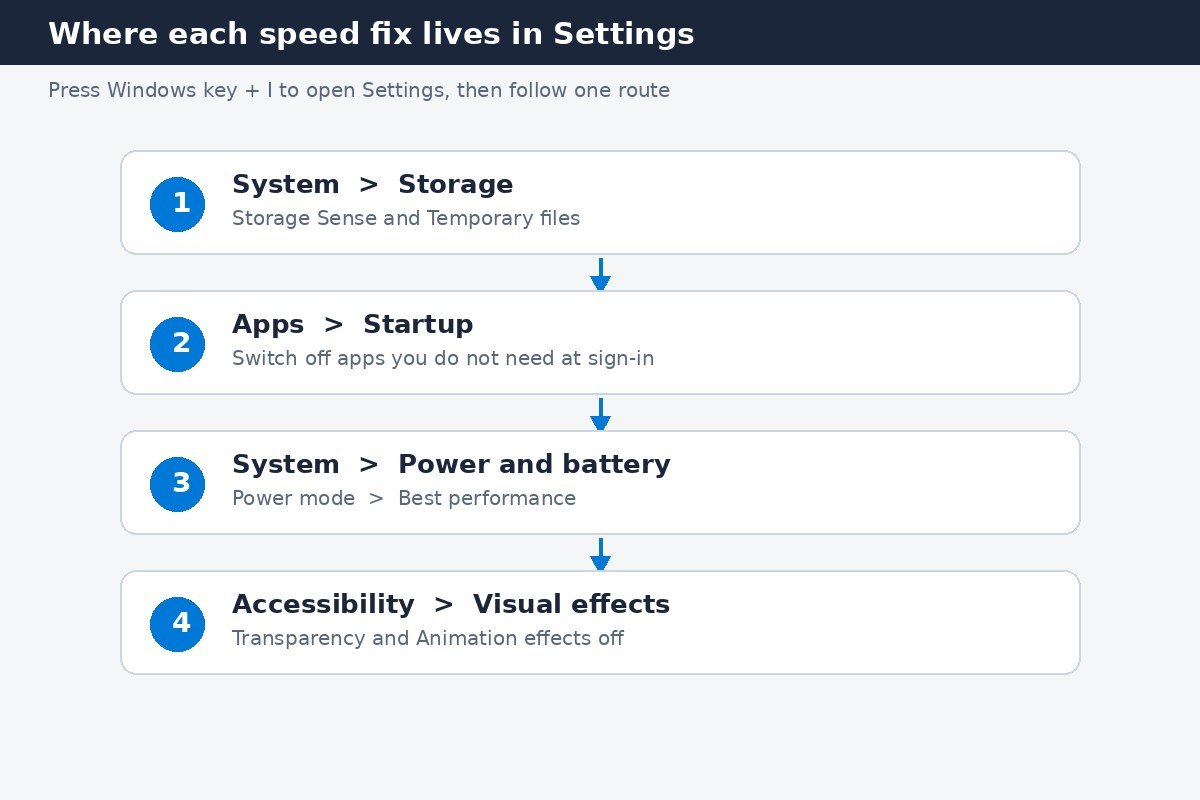
While you are on the Storage page, look at Temporary files as well. Select Temporary files, tick the categories you want to remove, and select Remove files. Check the list first: a previous Windows installation can take up several gigabytes, and deleting it means you cannot go back to the previous version. Then look at Cleanup recommendations on the same page, which lists large files and apps you do not use, and skip anything you do not recognise. Finally, uninstall the apps you no longer use: go to Start, then Settings, then Apps, then Installed apps, find the app, select More options (the three dots), and select Uninstall. Start with trial software that came with the PC, games you finished, and duplicate tools that do the same job. Do not uninstall anything with Microsoft, Windows or your PC maker’s name on it unless you know what it does, and never use a mass-removal script from the internet, which can remove things Windows needs.
4. Install updates and drivers, then run a malware scan
Updates are the fix people skip most often, and they are the first step Microsoft lists, because Windows updates often include fixes and performance improvements. A missing driver update can also cause symptoms people blame on Windows, such as stuttering video or slow Wi-Fi. Check for updates before you change any other setting, so you are not fixing a problem Microsoft already fixed.
Select Start, then Settings, then Windows Update, then Check for updates. If any updates are available, select Download and install, and restart when asked. Then check the optional updates as well, because a new non-critical driver can be hiding there. Go to Settings, then Windows Update, then Advanced options, then Optional updates, select any driver updates listed, and select Download and install. If your PC maker offers its own update app, check that too. After the updates finish, restart the PC so the new drivers actually load. If your PC still runs 24H2, install 26H2 through Windows Update: 24H2 Home and Pro reached the end of servicing in October 2026.
While updates are fresh in mind, run a malware scan, because malware can consume CPU and disk resources and drag performance down. Select Start, then Settings, then Privacy and security, then Windows Security, then Virus and threat protection, then select Quick scan. If the PC still behaves strangely, run a full scan from the same page when you can leave the PC alone for a while. If you already have a third-party security app installed, use its scan instead of running two at once. This is also the point to check the drive itself: select Start, type Defragment and Optimize Drives, open it, select the drive, and select Optimize. On a solid-state drive this runs a trim operation rather than a defragment, and Windows handles the difference itself. Microsoft publishes the full list of twelve fixes this guide follows as Tips to improve PC performance in Windows. If a fix here ever looks different from what you see on screen, trust the Microsoft page, because it is updated when the menus change.
5. Trim visual effects and set the right power mode
Windows 11 looks good, and some of that look costs speed. Transparency blurs the background behind the taskbar, the Start menu and panels, and animations slide and fade windows as they open. On a fast modern PC the cost is small. On an older PC, or one with integrated graphics and 8 GB of memory, windows feel slow to appear and menus lag. The changes in this section are instant and reversible, so try them and judge the result yourself.
Start with the two simple switches. Select Start, then Settings, then Accessibility, then Visual effects. Switch Transparency effects off to make window backgrounds solid instead of see-through, and switch Animation effects off to stop windows and menus sliding and fading as they open and close. The animation switch is the one that makes the desktop feel most instant. To go further, open the classic Performance Options dialog: select Start, type Adjust the appearance and performance of Windows, open it, and on the Visual Effects tab select Adjust for best performance. That switches off the full list of effects at once, including shadows and thumbnail previews.
Then check the power mode, which decides how hard the processor is allowed to work. Select Start, then Settings, then System, then Power and battery. In the Power mode dropdown, select Best performance. This helps most on a desktop PC, or on a laptop while it is plugged in. Microsoft warns that Best performance increases power consumption, and on laptops it will drain the battery more quickly and may cause the device to run warmer, so use it only when you need maximum performance and power is not a limitation. When you unplug a laptop, switch back to Balanced or Best power efficiency.
| Setting | Where to find it | Best choice |
|---|---|---|
| Transparency effects | Settings, Accessibility, Visual effects | Off on older or slower PCs |
| Animation effects | Settings, Accessibility, Visual effects | Off for the most instant feel |
| Visual effects preset | Adjust the appearance and performance of Windows | Adjust for best performance, or Custom |
| Power mode, plugged in | Settings, System, Power and battery | Best performance |
| Power mode, on battery | Settings, System, Power and battery | Balanced or Best power efficiency |
| Notifications | Settings, System, Notifications | Off for apps you do not need |
6. Restart properly, and know when hardware is the problem
Many people never actually restart their PC. They close the lid, the PC sleeps, and the same session runs for weeks, collecting stuck processes and half-finished updates. A restart is the simplest way to clear the pile, so select Start, then Power, then Restart, and after the restart open only the apps you need. Do this at least once a week, and always after installing updates.
There is one catch with restarting: Fast Startup. When Fast Startup is on, shutting down saves part of the system session, so switching the PC on again restores that session instead of starting fresh. A restart always starts fresh, which is why Restart fixes problems that Shut down does not. If your PC ignores shutdowns or behaves oddly after switching on, Fast Startup may be part of the story, and our guide to turning off Fast Startup in Windows 11 walks through switching it off and what changes when you do.
Now the honest part. If you worked through the fixes above and the PC is still slow, the limit may be hardware, not settings. Microsoft says the same in its own performance guide: older PCs with outdated hardware may not see significant improvements from these steps, and upgrading the device may be the best long-term solution. The minimum requirements for Windows 11 are a compatible 64-bit processor, 4 GB of RAM and a 64 GB storage device, but that minimum is the floor for installing Windows, not a comfortable experience with a modern browser and several apps open. Two upgrades make the biggest real-world difference. The first is memory: a PC with 4 GB of RAM will struggle with a browser full of tabs, and moving to 8 GB or 16 GB changes how the PC feels more than any setting. The second is storage: if Task Manager shows your drive as HDD, a traditional spinning hard drive, swapping it for an SSD is the single biggest speed upgrade a slow PC can get. Before you spend money, open Task Manager, go to the Performance tab, and look at what the Disk entry says. If it says SSD and memory usage sits near the top while you work, price memory first. If it says HDD, price the drive first.
Finally, skip the things that promise a miracle. Registry cleaners, RAM boosters and paid PC optimizer apps promise dramatic speed-ups and mostly deliver risk: a wrong registry change can break Windows, and a RAM booster fights the way Windows already manages memory. Every fix in this guide uses tools already in Windows, costs nothing, and can be undone.
Work through the fixes in order, one at a time, and restart after the updates and startup changes so you can feel what each one did. Most slow Windows 11 PCs come back to life after the first three sections alone: fewer startup apps, more free space, and updates installed.

- How to Speed Up Windows 11 - November 19, 2026
- How to Take a Screenshot on Windows 11 - November 18, 2026
- How to Turn Off Dynamic Lock in Windows 11 - November 17, 2026