
The quickest way to turn off finish setting up your device in Windows 11 is to open Settings, go to System, then Notifications, then Additional settings, and clear the checkbox about suggesting ways to finish setting up the device. It works on every edition, including Home, and it stops the prompt for the account you are signed in with. If the checkbox is missing or the screen keeps returning, the registry and Group Policy methods below give you two stronger options.
What this screen is and why it keeps coming back
The screen is called the Second Chance Out-of-Box Experience, or SCOOBE for short. It is the same setup flow Windows shows on a brand new PC, appearing again later because the first setup was left incomplete. Microsoft describes SCOOBE as a way to finish setting up a device that was only partially configured, and says it typically appears on its own when the original setup was not completed. That is why it often shows up after a feature update or a restart.
On the screen itself, Windows offers to finish things like signing in with a Microsoft account, setting up OneDrive, and turning on Windows Backup. The screen blocks the desktop until you deal with it, and it can return days later even after you skip it. It is not a virus, and it is not a sign that anything is broken. It is Windows nudging you to complete setup steps you skipped, and the nudging has an off switch.
The current version of Windows 11 is version 26H2, released on 29 September 2026, and the steps in this guide apply to it as well as to 24H2 and 25H2. Microsoft lists the current release on its Windows 11 release information page. One thing to know before you start: the exact wording of the checkbox can vary slightly between builds, so look for the option that mentions finishing setup if the words on your screen differ a little from the ones quoted here.
Stuck on the screen right now? Get past it in seconds
If the full-screen prompt is in front of you right now, you do not need to complete any of the offers to reach your desktop. Look for the small Remind me in 3 days link and click it. Windows closes the prompt and lets you sign in normally.
That link is only a pause button, so the screen will come back in three days. Use it to reach your desktop, then follow Method 1 below. The whole fix takes about a minute.
Method 1: Turn off the setup prompt in Settings
This is the method most people should use. It needs no administrator account, and it takes effect right away. The only catch is the per-account trap: the checkbox applies only to the account you are signed in with. Anyone else on the same PC needs to repeat these steps in their own account.
- Press Windows key + I to open Settings.
- Select System in the left-hand menu.
- Select Notifications. You may need to scroll down the System page to find it.
- Scroll to the bottom of the Notifications page and open Additional settings.
- Clear the checkbox labelled Suggest ways to get the most out of Windows and finish setting up this device.
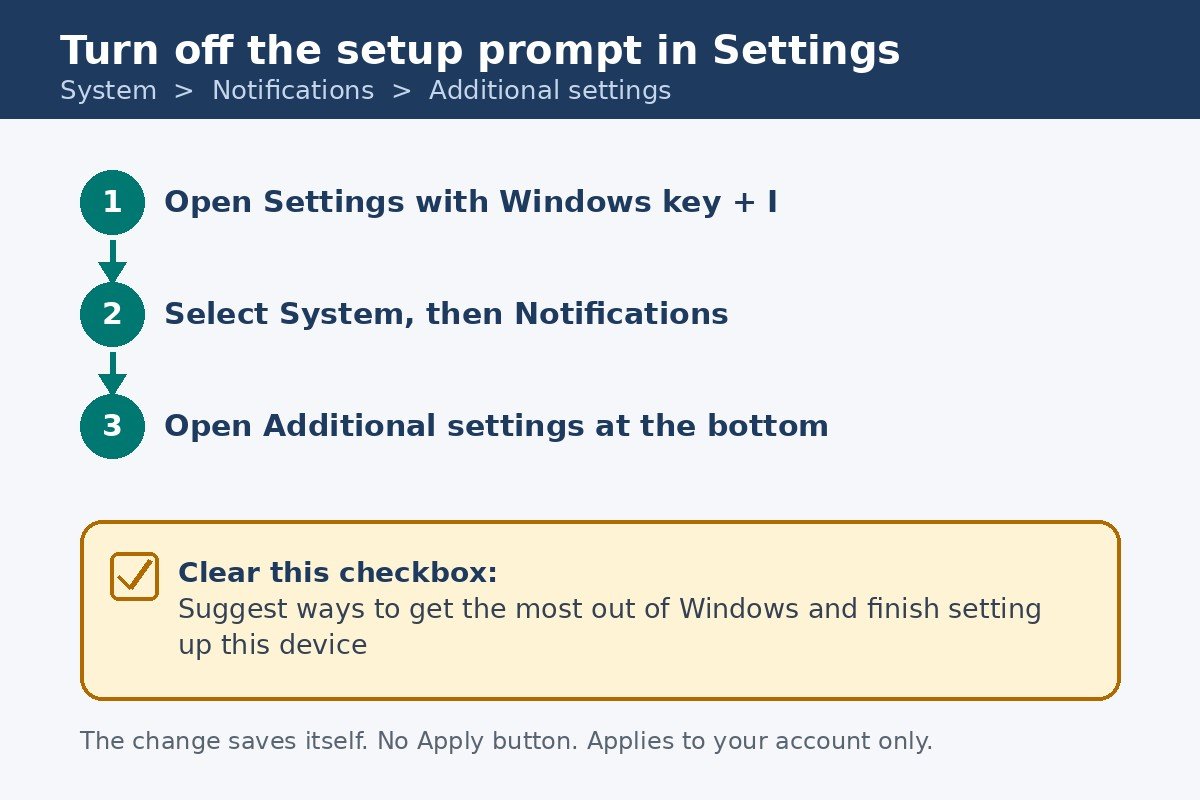
There is no Apply or OK button: the change saves itself as soon as you clear the box. Restart the PC once to confirm it has taken effect. While you are there, you can also clear the related option about showing the Windows welcome experience after updates. That is a separate control, so it is optional.
The same Notifications page holds the rest of the suggestion controls. Our guide to turning off suggested actions in Windows 11 walks through the other pop-ups there, so you can switch off the ones you do not want and leave the rest alone.
Method 2: Turn off the prompt in the registry
Use this method if the Settings checkbox is missing, or if you cleared it and the screen still came back. The registry is the low-level settings store Windows reads when it decides whether to show the setup prompt. Follow the path exactly and back up first, because a wrong edit in the wrong place can cause real problems.
One honest note first. Microsoft does not document this registry value in its support pages. The value is confirmed in answers on Microsoft’s own community support site and is widely reported, but it is not an official Microsoft setting, so treat it as an advanced fallback rather than a guaranteed fix on every build.
- Press Windows key + R, type regedit, and press Enter. If User Account Control asks for permission, click Yes.
- Before changing anything, choose File, then Export, and save a backup of the registry somewhere you can find it.
- In the address bar at the top of Registry Editor, paste this path and press Enter: HKEY_CURRENT_USER\Software\Microsoft\Windows\CurrentVersion\UserProfileEngagement
- In the right-hand pane, find the value named ScoobeSystemSettingEnabled. If it is not there, right-click in the empty space, choose New, then DWORD (32-bit) Value, and name it exactly ScoobeSystemSettingEnabled.
- Double-click the value, change the Value data to 0, and click OK.
- Close Registry Editor and restart the PC.
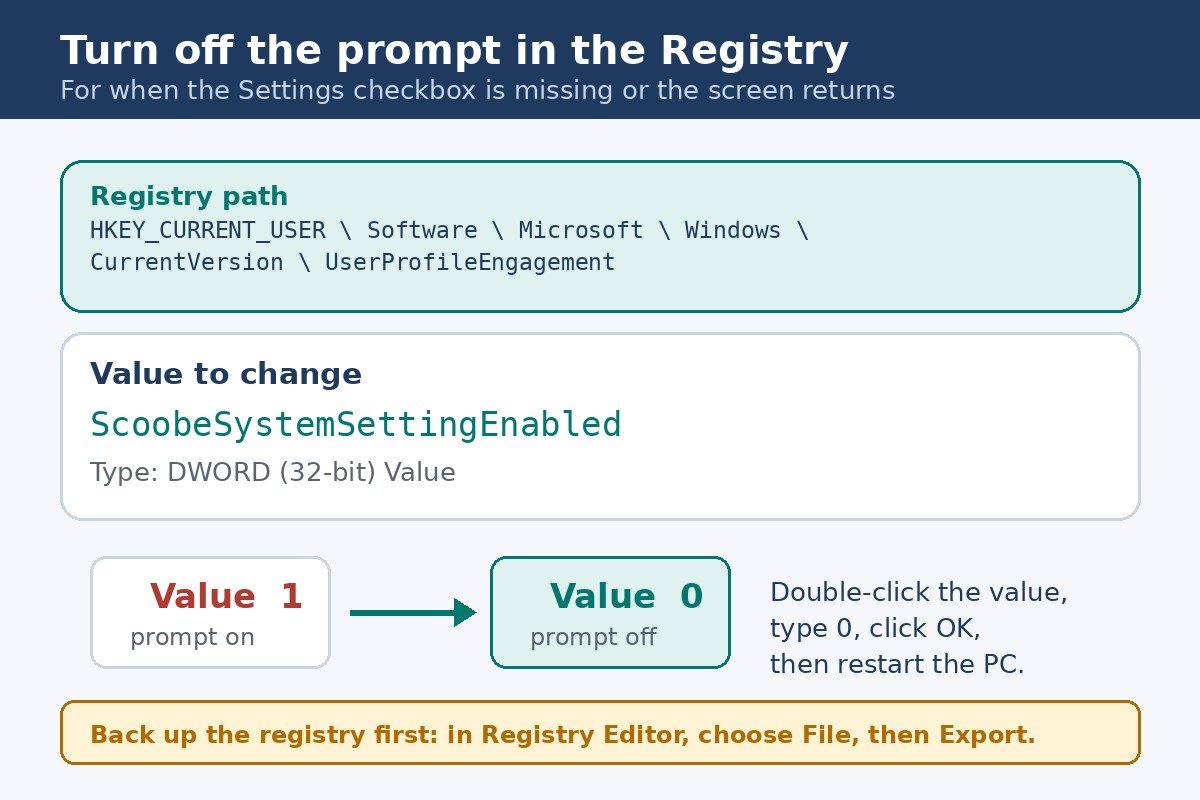
A value of 0 switches the setup prompt off, and 1 switches it on again. Because the key sits under HKEY_CURRENT_USER, this method has the same per-account limit as the Settings checkbox, so repeat it for each account that sees the screen.
Method 3: Turn off the welcome screen for every account with Group Policy
This method is for Windows 11 Pro, Enterprise, and Education, using the Local Group Policy Editor, which Windows 11 Home does not include. Its advantage is scope: one policy covers every account on the PC, so it suits a shared family computer or a small office machine.
- Press Windows key + R, type gpedit.msc, and press Enter.
- In the left-hand pane, open Computer Configuration, then Administrative Templates.
- Open Windows Components, then Cloud Content.
- Double-click the policy named Turn off the Windows Welcome Experience.
- Select Enabled, then click Apply and OK.
- Restart the PC, or sign out and back in, so the policy applies.
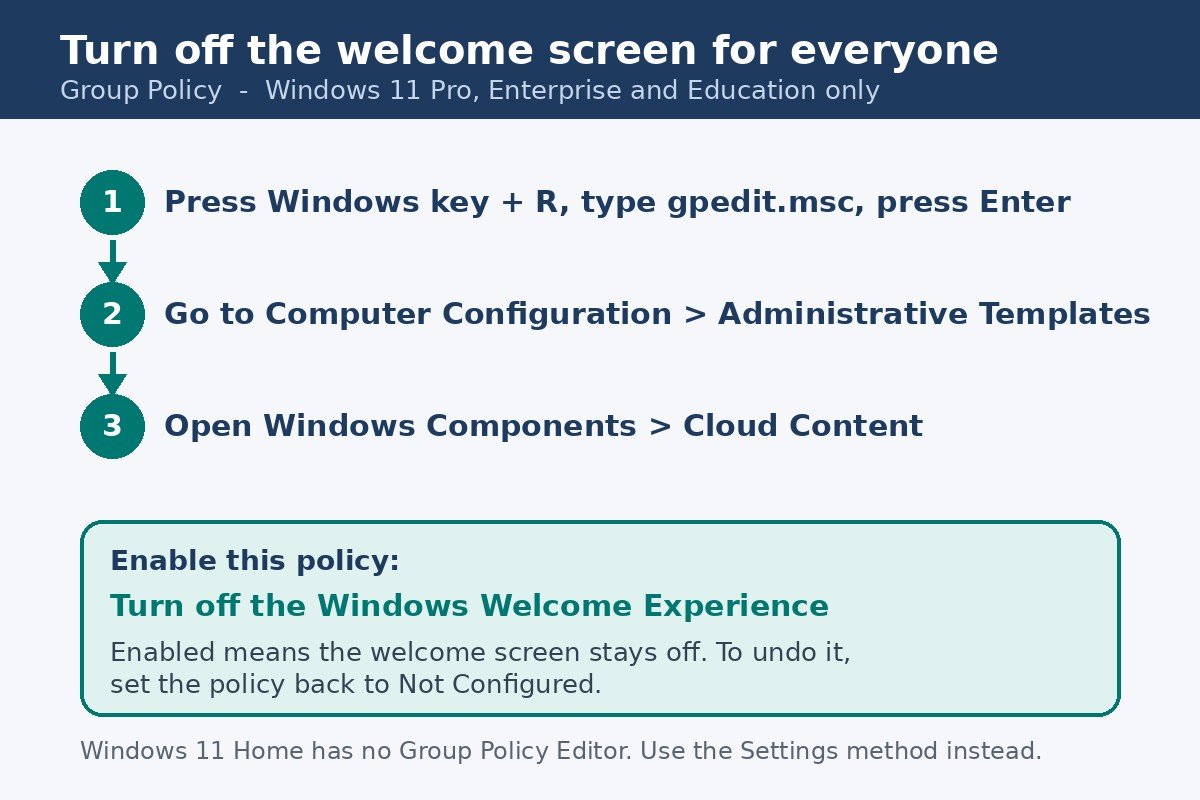
The wording is a double negative, so read it carefully: you set the policy to Enabled in order to turn the welcome screen off. To undo it later, open the same policy and set it back to Not Configured. Microsoft documents this policy in its Experience policy reference: it stops the welcome experience from appearing when there are updates and changes to Windows and its apps.
Be clear about what this policy does and does not do. It controls the Windows Welcome Experience, the screen that highlights what is new after an update: a close cousin of the finish-setup screen, not the same screen. If the setup prompt is your problem, the Settings checkbox in Method 1 is the direct control, and this policy is the companion that stops the related welcome screen. On a Pro PC, using both gives the cleanest result.
If the screen still comes back
If you cleared the Settings checkbox and another account still sees the screen, nothing has failed: the setting only covers your account, so repeat it in the other account, or use the Group Policy method on a Pro PC to cover everyone at once. If you used the registry method, double-check the value name for a typo, since Windows ignores a misspelled value, and confirm the Value data is 0.
A feature update can also bring the screen back, because major updates sometimes reset notification settings. After a big update, reopen the Additional settings section and confirm the checkbox is still clear. The same applies after a reset or a repair install. In that case, just repeat Method 1.
Finally, make sure you are chasing the right screen. The finish-setup prompt and the Windows feedback prompts are different things with different switches. If what keeps appearing asks you to rate Windows or send feedback, that is controlled elsewhere. Our guide to turning off Windows 11 feedback notifications covers that setting, so you can quiet the right prompt.
| Your situation | Best method | Why |
|---|---|---|
| You want the screen gone, one account | Settings checkbox | Fastest, safest, works on Home and Pro |
| The checkbox is missing or the screen returns | Registry value | Works on every edition when Settings does not |
| Several accounts share the PC | Group Policy | One policy covers every account at once |
| You are on Windows 11 Home | Settings or registry | Home has no Group Policy Editor |
The finish-setup screen is one of the easier Windows annoyances to fix: the off switch is a single checkbox in Settings. Clear it, restart once to confirm, and the prompt should leave you alone. If it comes back after a major update, you now know where the switch lives.

- Turn Off Finish Setting Up Your Device in Windows 11 - November 16, 2026
- How to Turn Off Suggested Actions in Windows 11 - November 15, 2026
- How to Turn Off Enhance Pointer Precision in Windows 11 - November 14, 2026