
Spotlight is the fastest way to find things on a Mac. Press Command and Space, type a few letters, and the app or file you want is right there. The trouble starts with the results underneath your own files. Those web suggestions, news stories, and App Store picks do not come from your Mac. They come from Apple, and they only exist because your Mac sends what you type away to fetch them.
Turning them off takes about a minute, and it does not break Spotlight. Your apps, files, folders, and contacts keep working exactly as before. Only the web part goes away. There is one catch most guides skip: Safari has its own separate suggestions switch, and it keeps sending queries after the system one is off. This guide covers both.
The quick answer
Open System Settings, click Spotlight in the sidebar, and under Search results, uncheck Siri Suggestions. That is the whole job for Spotlight itself. Press Command and Space and type something to check: you should see only results from your own Mac, with no web suggestions, news, or App Store entries below them.
Then open Safari, go to Safari, Settings, Search, and uncheck Include search engine suggestions and Include Safari Suggestions. That stops the second, separate flow of suggestions in the browser address bar. If you only do the first step, Safari keeps suggesting. If you only do the second, Spotlight keeps suggesting. Do both.
What Spotlight Suggestions actually send to Apple
The name on the checkbox is misleading. The box is labelled Siri Suggestions, but it controls the web side of Spotlight. With it on, every Spotlight search that could use a web answer sends limited information to Apple so Apple can return up to date suggestions. Apple states on its Search and Privacy page that this can include your location, topics of interest, your search queries, the suggestions you selected, the apps you use, and related device usage data. What it does not include is the search results that show files or content already on your device. Those never leave your Mac.
Apple also states that the information sent to Apple is not tied to your Apple Account or email address. It is associated with a random, device generated identifier that rotates multiple times per hour. That is a real privacy protection, and it is worth knowing about before deciding how much this matters to you. The data is not attached to your name, but it is still your search terms and your location leaving your computer, and a small sampled set of search queries may be shared with search tools so Apple can evaluate and improve Search. The problem is that the switch is on by default, and most people never knew it was there.
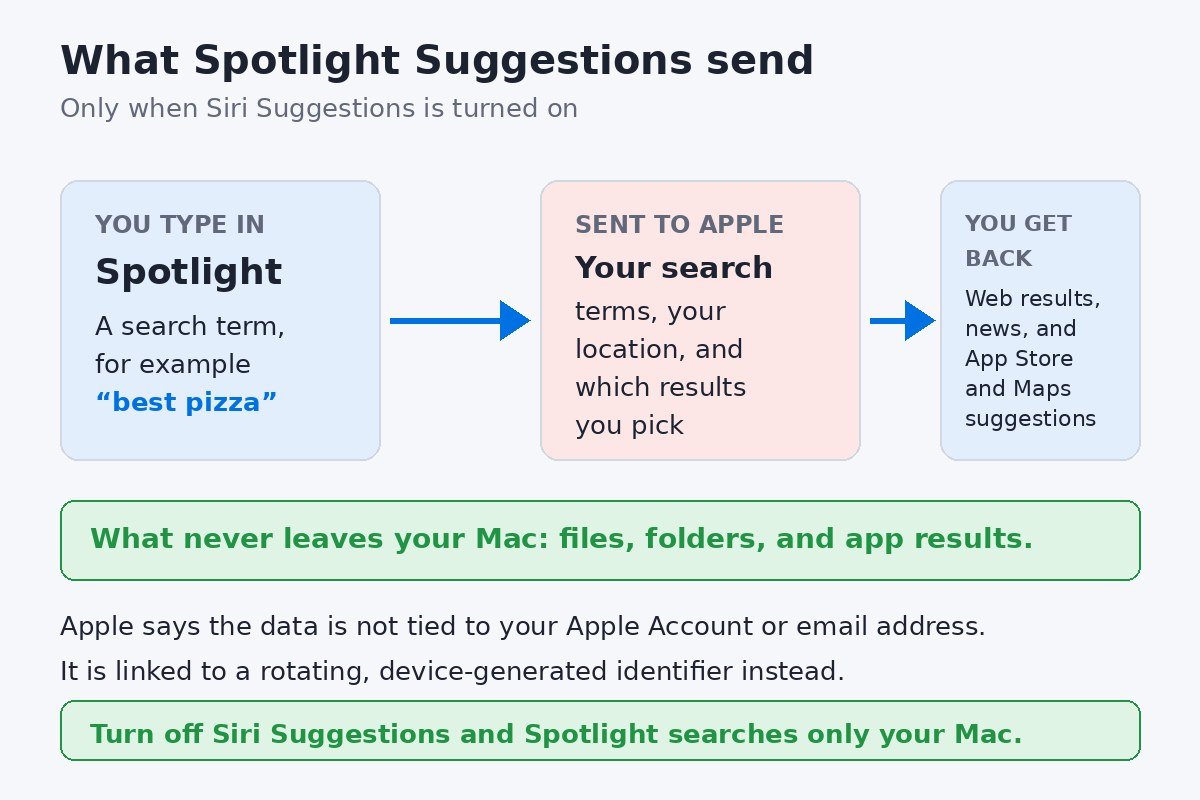
There is one more setting in the same Spotlight pane worth knowing about. Improve Search lets Apple store certain information to improve search results. It is separate from the suggestions checkbox: leaving it on does not bring suggestions back, but it does keep sending data for improvement purposes. If you want to limit what leaves your Mac as much as the settings allow, turn it off too. You can read exactly what Apple says is sent and how it is handled on Apple’s Search and Privacy page.
How to turn off Spotlight Suggestions on Mac
Follow these steps on any Mac running a current version of macOS. The whole thing takes about a minute, and nothing needs to restart.
- Click the Apple menu in the top left corner of your screen, then choose System Settings.
- In the sidebar, click Spotlight. You may need to scroll down the sidebar to find it. If your Mac shows a combined Siri and Spotlight entry instead, click that, the Search results list is in the same place.
- Look for the Search results list on the right. It shows every category Spotlight can search, such as Applications, Documents, Folders, Images, and more.
- Find Siri Suggestions in that list and uncheck its box.
- Optional, but worth doing while you are here: turn off Improve Search if you do not want Apple storing search information to improve results.
- Close System Settings. There is no save button and no restart. The change applies right away.
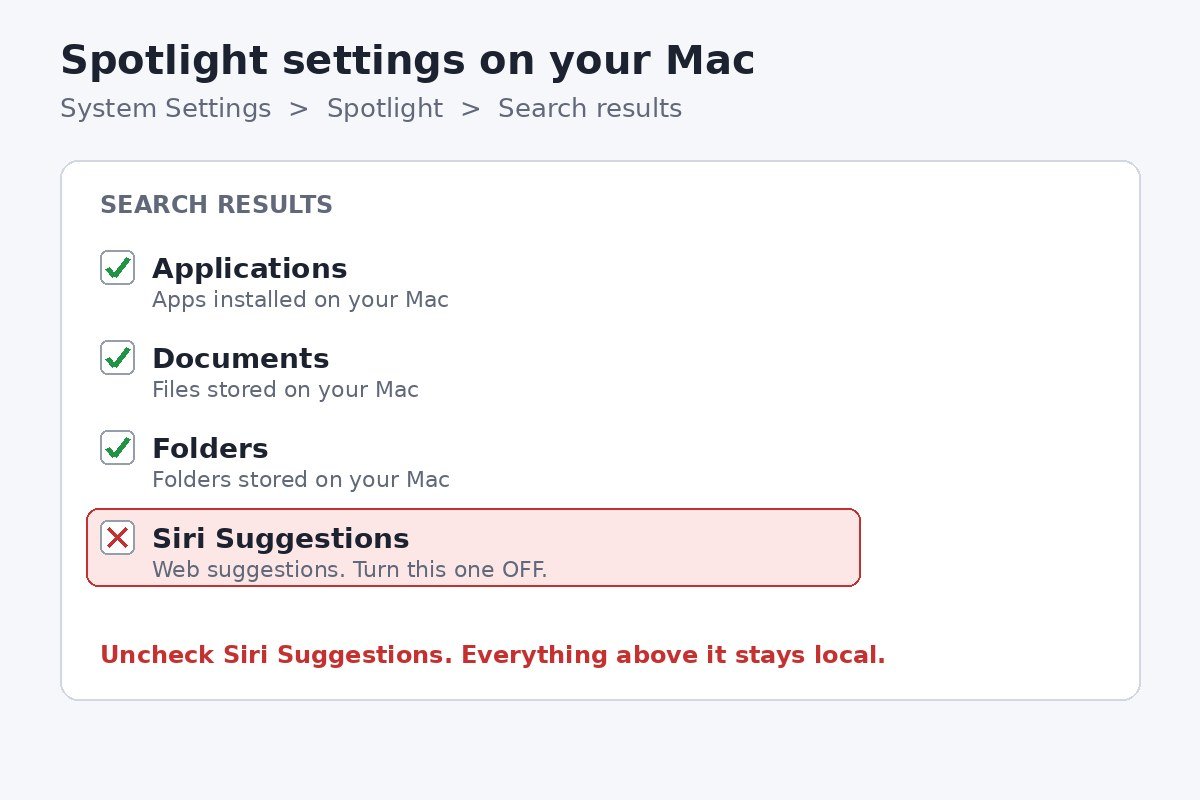
Apple documents this same path in its own Spotlight settings guide for Mac: open System Settings, click Spotlight in the sidebar, then change the categories under Search results. By default, Spotlight results include Siri Suggestions, so the box starts checked. Everything else in the list is local content, and you can leave those boxes exactly as they are.
Check that it worked
Press Command and Space to open Spotlight, then type something that used to bring up web results, such as the name of a film or a place. You should now see only apps, files, folders, and other items from your own Mac. If web results, news stories, or App Store suggestions still appear, the box did not actually get unchecked, or you are looking at suggestions from a different source, which the later sections cover.
One more check is worth doing. Type the name of an app you use every day. It should appear at the top of the results just as fast as before. Turning off suggestions does not slow down local search or remove any of your files from the index. If Spotlight stops finding an app entirely, that is a different problem, a damaged search index, and unchecking a box will not fix it.
What changes and what stays the same
People hesitate over this switch because they worry it will break search. It will not. The table below sets out what you lose and what you keep.
| After turning off Siri Suggestions | What happens |
|---|---|
| Apps, files, folders, and contacts | Still appear in Spotlight, just as fast as before |
| Web results, news, and Wikipedia entries | Gone from Spotlight results |
| App Store and Maps suggestions | Gone from Spotlight results |
| Calculator and unit conversion answers | Still work, because they are calculated on your Mac |
| Searching inside apps such as Mail and Notes | Unchanged, because those searches are local |
| Siri itself | Still works. This switch does not turn Siri off |
The one real loss is convenience. Without web suggestions, Spotlight cannot answer a question like the score from last night’s match from the search box. If you miss the web answers, the switch is reversible: go back to the same pane and check the box again.
The second switch: turn off suggestions in Safari
This is the step almost every short guide leaves out, and it is the reason people think the Spotlight fix did not work. Safari has its own suggestions on a separate switch. When you type in the Safari address bar, Safari can send what you type to your search engine for suggestions, and it can also show Safari Suggestions drawn from Apple services such as Music, the App Store, and Maps. Neither stops when you uncheck the box in Spotlight settings, because Safari is a different app with its own settings.
- Open Safari on your Mac.
- Click Safari in the menu bar at the top of the screen, then choose Settings. On older macOS versions the same menu item is called Preferences.
- Click Search in the settings window.
- Uncheck Include search engine suggestions. This stops Safari sending the words you type to your search engine as you type them. Apple notes that the search engine may record your search terms when this is on.
- Uncheck Include Safari Suggestions. This stops the Apple service suggestions in the address bar.
- Close the settings window and type something in the address bar to check. You should see only your own history and bookmarks, with no search engine or Apple suggestions below them.
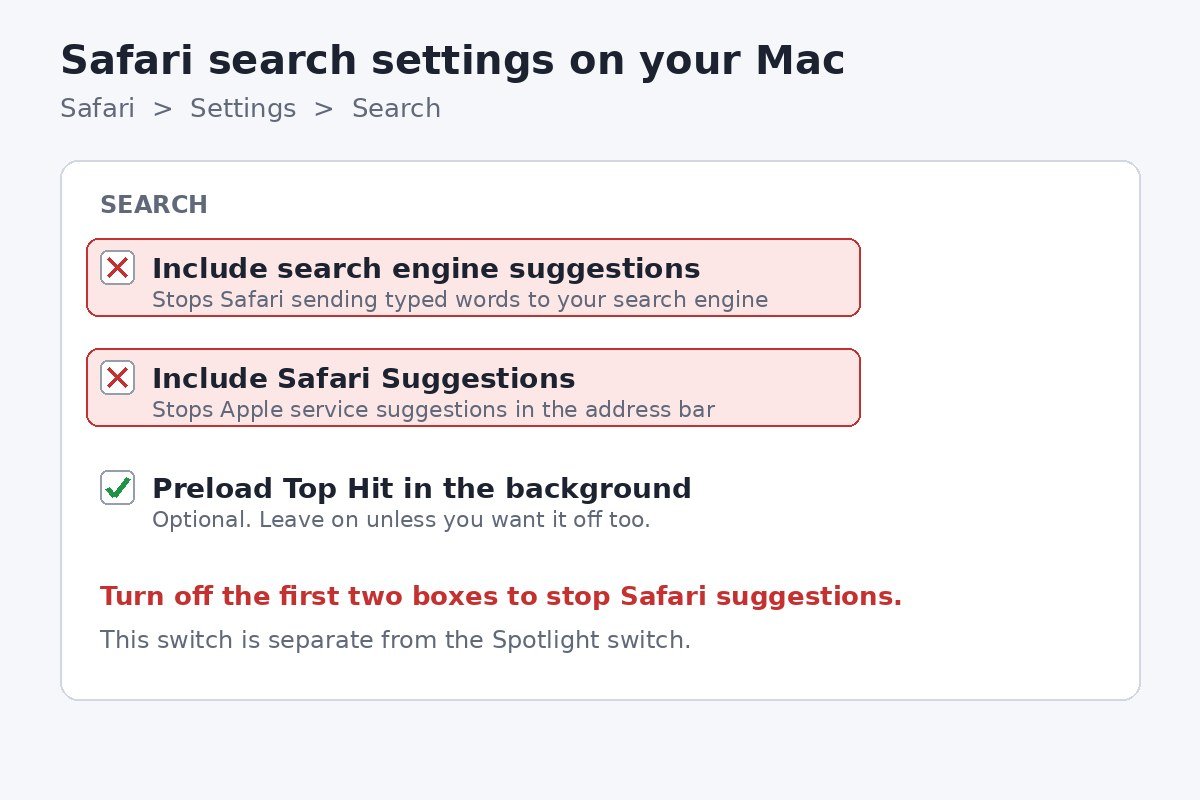
One more box in the same pane is worth knowing about. Preload Top Hit in the background loads the top search result before you press Return, which means your Mac fetches a page you have not chosen yet. If you want the quietest possible setup, uncheck that too. It does not bring back the suggestions you just turned off.
The version trap: why older guides point to the wrong pane
If you have ever followed an older guide for this and ended up staring at a settings pane that does not match, the version trap is why. Apple has moved and renamed this pane more than once. Older macOS put Spotlight inside System Preferences, under a combined Siri and Spotlight pane, and the checkbox was called Spotlight Suggestions. Newer versions moved it into System Settings, gave Spotlight its own entry in the sidebar, and renamed the box Siri Suggestions. The switch does the same job in both cases, but a guide written for one layout reads like nonsense on the other.
| Your macOS version | Where to look | What the box is called |
|---|---|---|
| macOS 27 Golden Gate (current) | System Settings, Spotlight, Search results | Siri Suggestions |
| macOS 26 Tahoe | System Settings, Spotlight, Search results | Siri Suggestions |
| macOS 15 Sequoia and macOS 14 Sonoma | System Settings, Spotlight, Search results | Siri Suggestions |
| macOS 13 Ventura | System Settings, Siri and Spotlight, Search results | Siri Suggestions |
| macOS 12 Monterey or earlier | System Preferences, Spotlight, Search Results | Spotlight Suggestions |
Before you start, check which version you are running, so you know which row of that table applies. Click the Apple menu, choose About This Mac, and read the version name and number at the top of the window. The current release is macOS 27, called Golden Gate. Tahoe is version 26, not 27, and that mix up is common. If your Mac is on Tahoe or Golden Gate, the Spotlight entry sits on its own in the System Settings sidebar, and you may need to scroll down to see it. If your Mac is older and shows a combined Siri and Spotlight entry, click that instead and look for the same Search results list.
One honest note about the table above: the Apple Support page I read while writing this is labelled for an earlier macOS version, and I could not open a live Apple document that shows the exact sidebar layout of macOS 27 Golden Gate. The Spotlight pane path is the one Apple documents, and it matches the layout used since macOS 13, so it is the right primary route. If your Golden Gate Mac shows the combined Siri and Spotlight name instead of a standalone Spotlight entry, use that entry and the same Search results list.
If suggestions still appear after you turn them off
Sometimes the web results disappear from Spotlight but suggestions keep popping up somewhere else, and it feels like the switch did nothing. In almost every case, the suggestions are coming from a different setting, not from the one you just changed. Work through the sections below in order.
Suggestions inside individual apps
Siri Suggestions also appear inside apps, such as Mail offering to create a calendar event from an email. Those are controlled per app, not by the Spotlight checkbox. Go to System Settings, then Apple Intelligence and Siri, or Siri on older versions, then click Siri Suggestions and Privacy. Pick an app from the list and turn off Show Siri Suggestions in application, then repeat it for any other app that keeps suggesting.
Location based suggestions
Some suggestions are driven by where you are rather than what you type. To stop those, open System Settings, click Privacy and Security, then Location Services. Scroll to the bottom, click Details next to System Services, and turn off Suggestions and Search, or Location based suggestions if that is the label your version shows.
Old results still showing
Spotlight keeps a short memory of recent searches, and those can look like suggestions after the switch is off. They are not new web results, they are your own recent searches, and they fade as you make new searches. If a specific unwanted suggestion keeps appearing in Safari, it is usually a bookmark or a history entry rather than a live suggestion. In Safari, highlight it with the arrow keys and press Shift and Delete to remove it.
Spotlight is not finding your files at all
This is the opposite problem, and it has a different cause. If Spotlight finds nothing, or misses apps and files you know are on the Mac, the search index itself is damaged. No checkbox fixes that. What fixes it is rebuilding the index from scratch, which is covered in the guide to rebuilding the Spotlight index on Mac when search is not finding apps. Do not confuse the two jobs: turning off suggestions changes what Spotlight shows, rebuilding the index changes whether Spotlight can find things at all.
Should you turn Spotlight Suggestions off?
For most people, yes. The suggestions add little, and they cost privacy. Spotlight’s best work is finding your own things, and that works just as well with the switch off. The web results are better in a browser, where you can see the source and judge several results for yourself. In Spotlight, a web suggestion is a single line with no context, and it is easy to tap the wrong one.
The one case where leaving suggestions on makes sense is if you genuinely use Spotlight as a quick answer box, for example to check a film time or a sports score without opening a browser. That is a fair trade, as long as it is a choice rather than a default nobody noticed. The point of this guide is not that the switch must be off. It is that the switch exists, it is on by default, and you should be the one who decides.
If you use an iPhone as well, the same idea applies there, but the switches live in different places. The iPhone version of this job is covered in the guide to turning off Siri Suggestions on iPhone. It is worth doing on both devices if you want suggestions off everywhere, because changing the Mac does not change the phone.
What to check after you change the settings
- Press Command and Space and type a film name. Only your own files and apps should appear.
- Type a place name in the Safari address bar. No search engine or Apple suggestions should appear below what you typed.
- If you share the Mac, tell the other people who use it, so nobody wonders where the web results went.
That is the whole job. It costs nothing to glance at the Spotlight pane after a major upgrade, just to confirm the box is still unchecked. If an update ever moves the pane again, the setting will still be called Siri Suggestions, and it will still live under Search results. Once you know that, you can find it on any version without a guide.

- How to Turn Off Spotlight Suggestions on Mac - November 20, 2026
- How to Speed Up Windows 11 - November 19, 2026
- How to Take a Screenshot on Windows 11 - November 18, 2026