
Screen recording is built into every modern iPhone, so you do not need to download an app to capture what is on your display. You can record a how-to for a friend, save a game clip, or capture a bug to send to support, and the video saves straight to the Photos app. This guide covers iOS 27, current as of November 2026, with the latest update being iOS 27.2.1. It works on iPhone 11 and later, and on the second-generation iPhone SE and newer models.
The short version: open Control Center, tap the Record button, and wait for the three-second countdown. When you finish, tap the red recording indicator at the top of the screen and tap Stop. Your video is then waiting in Photos.
Record your screen in 30 seconds
Before you start, open the screen you want to record, since the countdown gives you only three seconds. If your screen keeps lighting up every time you pick up the phone, our guide to turning off Tap to Wake on iPhone walks through that setting.
- Open Control Center. On an iPhone with Face ID, swipe down from the top-right corner. On an iPhone with a Home button, swipe up from the bottom edge.
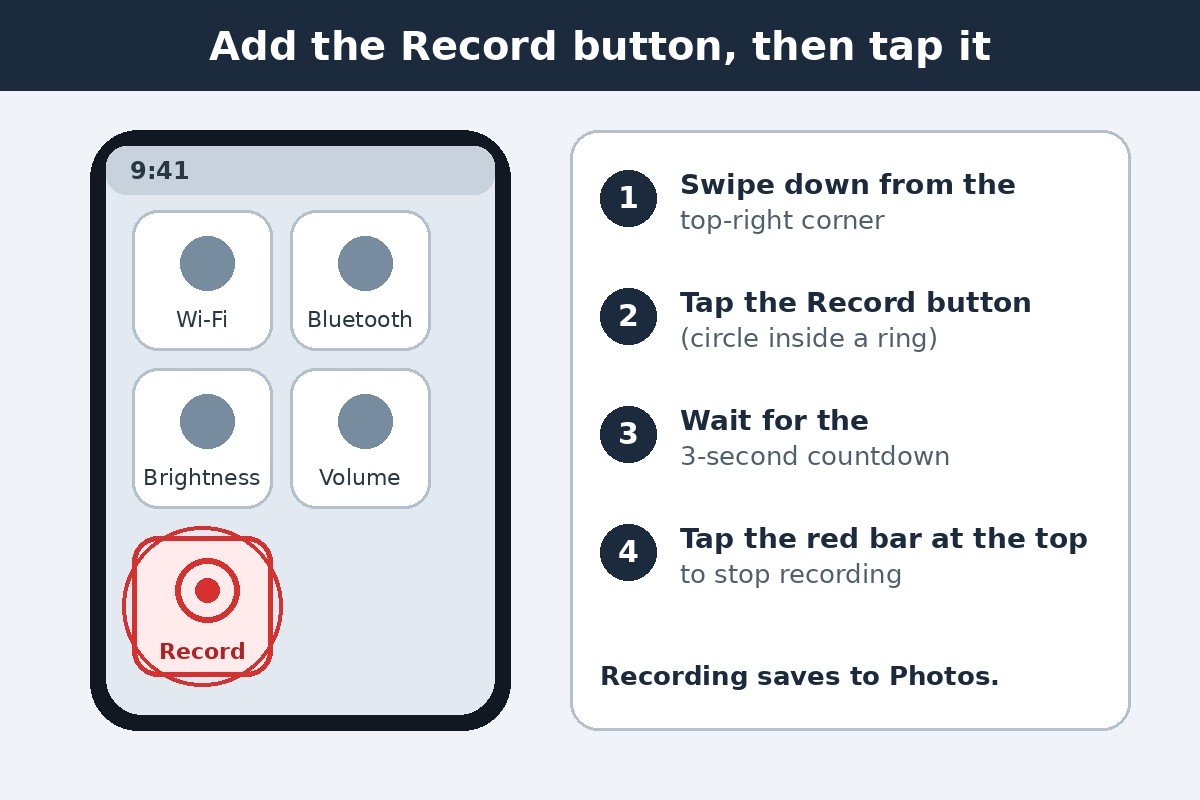
- Tap the gray Record button, which looks like a solid circle inside a ring. A three-second countdown begins.
- Leave Control Center and capture what you need. A red indicator at the top of the screen shows that recording is active.
- To stop, tap the red recording indicator at the top of the screen, then tap Stop. You can also open Control Center and tap the red Record button.
- Open the Photos app to find your recording. New recordings appear in your Library, and there is also a Screen Recordings album under Collections, then Media Types.
That is the whole process for a basic recording. The video captures the sounds your apps and system make, such as game audio and notification tones. If you want your own voice in the recording, read the section below on turning on the microphone.
Add the Screen Recording button to Control Center
If you cannot see the Record button in Control Center, it has not been added yet. On iOS 18 and later, including iOS 27, you add controls from inside Control Center itself. The older route through Settings no longer applies on these versions.
- Open Control Center by swiping down from the top-right corner, or swiping up from the bottom on an iPhone with a Home button.
- Tap the Add button (a plus sign) in the top-left corner. You can also touch and hold an empty area until the controls start to wobble.
- Tap Add a Control at the bottom of the screen to open the controls gallery.
- Find Screen Recording in the gallery and tap it. The control is added right away.
- Tap an empty area to leave editing mode. The Record button is now ready to use.
On iOS 17 and earlier, the path is different: go to Settings, tap Control Center, then tap the green plus sign next to Screen Recording. If you do not see that option, check for a software update under Settings, then General, then Software Update. Apple documents the current steps in its screen recording support page.
Record with sound: microphone and app audio
A plain tap on the Record button captures your screen and the audio your iPhone itself produces, such as the sound from a video or a game. Your voice is not included unless you switch the microphone on first. That catches many people out: they narrate a whole tutorial, then play it back and hear only silence where their voice should be.
- Open Control Center.
- Touch and hold the gray Record button. A small panel opens with extra options.
- Tap the Microphone button to turn it on.
- Tap Start Recording, then wait for the three-second countdown.
With the microphone on, the recording picks up both your voice and the sounds from your apps. Keep the phone reasonably close and record somewhere quiet, because the microphone also picks up background noise. If you only need the sound from an app, leave the microphone off. Note that some apps do not allow their audio or video to be recorded at all, usually for privacy or copyright reasons, so if one app stays silent while others record fine, the app itself is blocking it.
Record your iPhone screen on a Mac with QuickTime
If you want the recording to land straight on your computer, for example to edit a tutorial, you can record your iPhone through QuickTime Player on a Mac. The phone connects with a cable, and the Mac saves the video as a movie file.
- Connect your iPhone to the Mac with a USB-C or Lightning cable that carries data, not a charge-only cable. Unlock the iPhone, and tap Trust on the phone if it asks whether to trust the computer.
- Open QuickTime Player on the Mac.
- Choose File, then New Movie Recording. Do not choose New Screen Recording, because that records the Mac display instead of the phone.
- Click the small arrow next to the Record button and choose your iPhone under Camera. Under Microphone, choose your iPhone as well if you want its sound.
- Click the Record button. Click Stop when you finish, then choose File, then Save, to name and save the movie on your Mac.
| Method | Best for | Audio | Where it saves |
|---|---|---|---|
| Control Center on iPhone | Quick clips and everyday recording | App audio, plus your voice with the microphone on | Photos app |
| QuickTime on a Mac | Tutorials and editing on a computer | iPhone audio when the phone is the microphone | Movie file on the Mac |
| Third-party recorder apps | Extra editing or live streaming | Varies by app | Inside the app, or Photos |
Third-party recorder apps are the third option, but most people never need one. The built-in tool covers capture, and the Photos app covers trimming and sharing. Apps from the App Store add things like drawing on the screen or face camera overlays, so they suit creators rather than everyday use. If you record on Android as well, the choice there is different, because Android has no single built-in recorder on every phone. Our roundup of the best screen recorder apps for Android compares the options.
Find, trim, and share your recording
Every screen recording saves automatically to the Photos app as a video. The newest recording sits at the bottom of your Library. To see only recordings, open Photos, tap Collections, scroll to Media Types, and tap Screen Recordings.
Most recordings need a small tidy-up before sharing: the first seconds show Control Center closing. Trimming takes less than a minute in Photos, with no extra app.
- Open the Photos app and tap the recording you want to edit.
- Tap the Edit button.
- Drag either end of the frame viewer below the video to set the new start and stop points, then tap Done.
- Choose Save Video to replace the original with the trimmed version, or Save Video as New Clip to keep the original and save the trimmed copy alongside it.
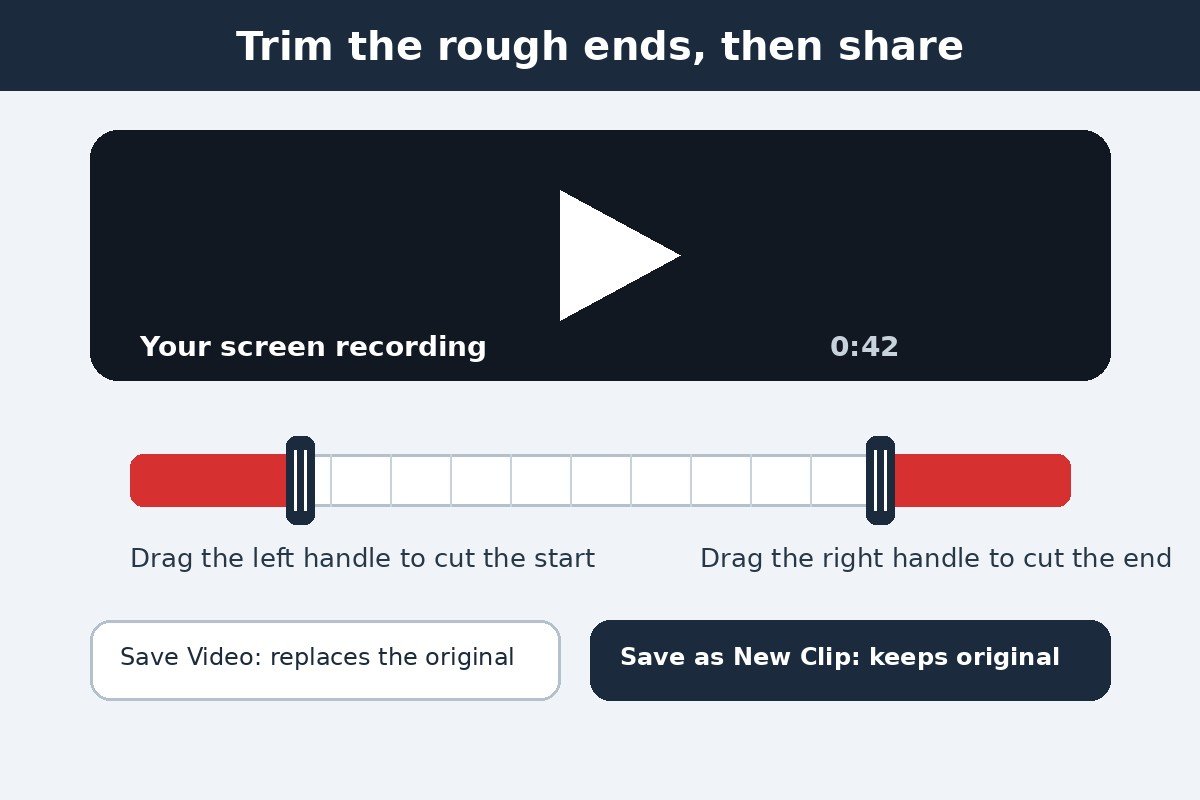
Choose carefully between the two save options. A clip saved with Save Video can be returned to its full length later by opening it, tapping Edit, then tapping Revert. A clip saved as a new clip cannot be reverted to the original, so keep the full recording if you may need the cut footage. Apple explains both options on its video editing support page.
To share the finished clip, open it in Photos and tap the Share button. AirDrop sends it to a nearby Apple device, and Messages and Mail send it to a contact. Large recordings can be slow to send over mobile data, so use Wi-Fi or AirDrop when the file is long.
Fix it when screen recording does not work
Screen recording rarely breaks, but when it does the cause is usually a setting rather than a fault with the phone. Match your symptom to its fix in the table below.
| Problem | Likely cause | Fix |
|---|---|---|
| Record button is missing | Not added to Control Center | Tap the plus sign, tap Add a Control, then tap Screen Recording |
| Recording has no sound | Microphone off, or the app blocks audio | Touch and hold Record and turn the microphone on |
| Black screen in a streaming app | Copyright protection blocks capture | Use the app’s own download or share feature |
| Recording stops on its own | Storage full, or an interruption ended it | Free space under Settings, then General, then iPhone Storage |
| Recording will not start | Mirroring active, or a restriction blocks it | Stop mirroring; check Settings, then Screen Time, then Content and Privacy Restrictions |
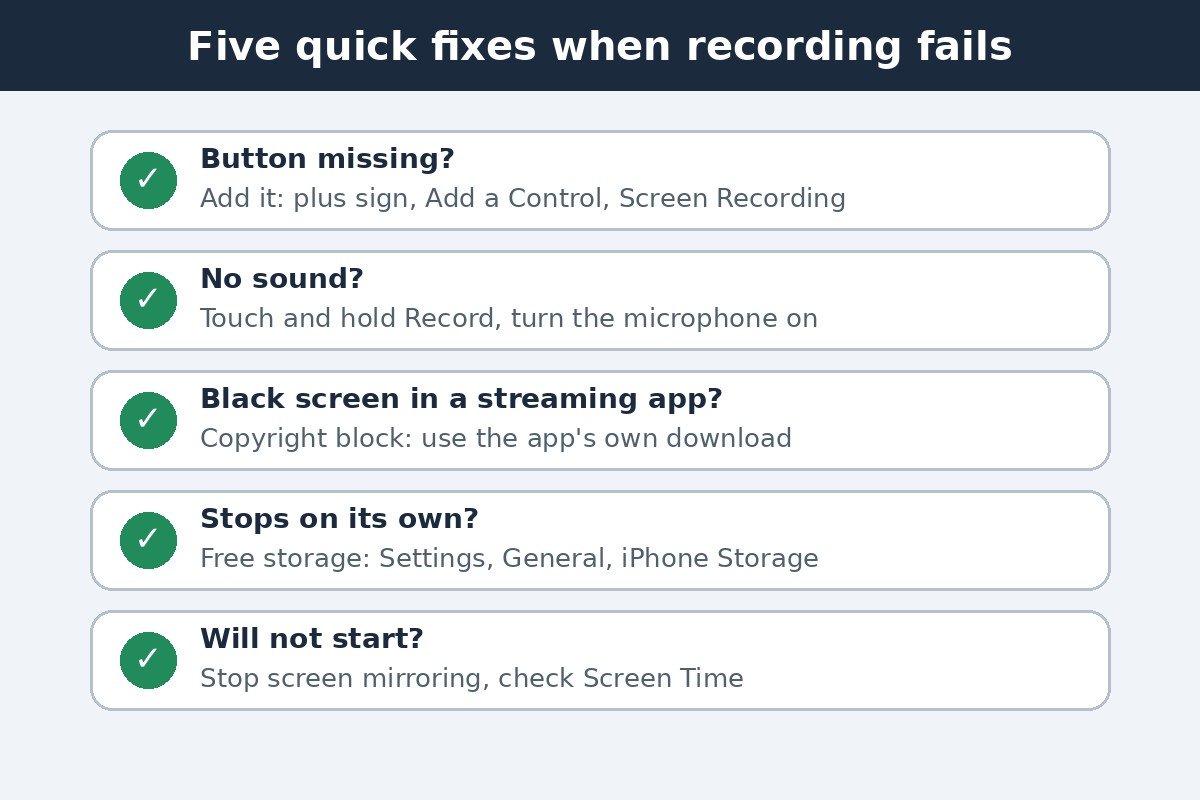
A black screen while recording a streaming app is the most confusing one, because recording works everywhere else. Streaming services protect their video with digital rights management, and the iPhone shows a black frame instead of the picture. There is no setting that changes this, and apps that claim to bypass it should be treated with caution. Check whether the app lets you download the content for offline viewing or share a link to it instead.
A recording that stops by itself is usually a storage problem, so check your free space under Settings, then General, then iPhone Storage, and delete old videos or offload unused apps before a long recording. Incoming calls and screen mirroring can also end a recording, because Apple does not allow recording and screen mirroring at the same time. If the Record button is greyed out, check Settings, then Screen Time, then Content and Privacy Restrictions. When none of these fixes helps, restart the iPhone and check for a software update under Settings, then General, then Software Update.
Screen recording on iPhone is a small feature that earns its place quickly once it is set up. Add the button to Control Center once, remember the three-second countdown, and switch the microphone on whenever your voice matters. After that, every clip is a quick tap away.

- How to Screen Record on iPhone - November 16, 2026
- How to Make the Windows 11 Taskbar Smaller - November 15, 2026
- How to Disable the Touch Keyboard Popup in Windows 11 - November 14, 2026